
Before we even think about reaching for that oven knob, let’s chat about the star of the show – selecting high-quality chicken cutlets. Not all chicken cutlets are created equal, folks! You’ll want to opt for those that are uniform in thickness to ensure an even cooking time. Trust me, no one likes a dry or undercooked cutlet!
Eyeing Thickness and Size
Here’s the skinny: when you’re standing in that grocery aisle, eyes glazed over with the sheer multitude of poultry options, remember, thickness is king. Look for cutlets that could pass as twins in thickness – this isn’t the time for a “variety pack”. And why’s that? Because nobody’s got time for playing favorites in the oven. Uneven sizes mean uneven cooking, and friends, that’s just a recipe for disappointment.
Considerations for Organic and Free-Range Options
Now, do you spring for organic or free-range? Hey, if you’re feeling fancy and want to flaunt that foodie cred, go for it! Organic options can be pricier but hey, we’re investing in the clucking best here. Not to mention, happy chickens roaming the range? Sounds like a taste worth chasing.
Prepping for Perfection
Once you’ve bagged the best cutlets, it’s time for a little TLC. First off, show ’em who’s boss and pat them dry like you’re prepping them for a sun-soaked holiday. This isn’t just busy work – a dry cutlet is a prime cutlet. It’s the canvas for all those delish flavors we’ll be adding later. And hey, if there’s a little extra fat hanging around, trim it off. We’re going for gold here, not girth.
Now that we’ve got our prime chicken cutlets, ready and raring to go, it’s time to crank up the flavor factor 🌶. Stick around, ’cause in the next act, we’re diving into the essential ingredients that’ll take your cutlets from basic to brilliant. Let’s spice things up a bit, shall we?
Essential Ingredients for Flavorful Cutlets
You’ve nailed the chicken selection – kudos! But now, let’s spice things up a notch. Lean in, because we’re about to embark on a culinary quest to flavor town with these essential ingredients. After all, why settle for bland when you can have grand?
Herbs and Spices to Elevate Taste
Forget about the humdrum salt and pepper routine – we’re better than that. Have you considered the smoky allure of paprika, or how about a whisper of dried oregano to transport you straight to the Mediterranean? There’s a whole world of herbs and spices waiting to wrap your chicken cutlets in a warm embrace. Seriously, they’ll thank you later.
Olive Oil or Butter? Let’s Debate
Now, are you on team olive oil or team butter? Olive oil brings that heart-healthy monounsaturated fat to the table, drizzling over your cutlets like sunshine in liquid form. But butter, oh butter, it’s the golden chariot driving those herbs home. Why not both? I’m not here to judge – I’m here to flavor!
Marinating Magic: To Soak or Not to Soak
If you’re up for a little pre-game, marinating can take your cutlets from ‘just okay’ to ‘oh, yay!’ Whether you let them soak up the goodness for 30 minutes or overnight, just know that a little bath in a zesty lemon-garlic mixture might just be the secret handshake into the cool cutlets club. Trust me, it’s worth the extra step.
But hey, don’t get lost in the sauce – remember, we’re building layers of flavor here. Each ingredient plays its part, and you’re the maestro of this delectable orchestra. So, give your cutlets the love they deserve, and they’ll sing on the plate.
And just when you think you’ve got it all figured out, we’re going to dive into the The Perfect Paraphernalia: Oven-Ready Gear. Stay tuned, because the right tools in your kitchen arsenal can mean the difference between good and great. Stick around, this story’s just heating up…
The Perfect Paraphernalia: Oven-Ready Gear
Alright, folks, grab your note pads and let’s circle around the campfire of kitchen wisdom. Now that we’ve got our flavor game on point, it’s time to talk turkey—or chicken, in this case. Let’s dive into the coup de grâce of oven-baked chicken cutlets: the gear!
First things first, you’re gonna want a bakeware set that’s more reliable than your favorite pair of blue jeans. Because let’s face it, nobody wants to scrape charred chicken off the pan while tearfully remembering what could have been. So, opt for non-stick bakeware for that golden crispness without the sticky drama.
- Selecting Bakeware for Ultimate Crispness
But wait, there’s more! Now, it’s the heavyweight match of the century: Foil vs. Parchment. Ding ding! In the blue corner, we have aluminum foil—shiny, versatile, and a bit of a heat conductor. And in the red corner, parchment paper—non-stick, heat resistant, and oven-safe. Who will you bet on? Personally, I’m team parchment for its non-stick elegance, but hey, you do you!
- Foil or Parchment Dilemma
Finally, we’ve got to talk temp. A reliable oven thermometer is your best pal when it comes to precision. Sure, your oven says it’s at 350°F, but if it’s lying to you like a rug, your cutlets might suffer. Trust but verify with a thermometer to ensure you’re not playing hot and cold with dinner.
- Temperature Tools for Precision
So, what’s the takeaway? Suit up with the right gear, and you’re halfway to the hall of fame of home-cooked cutlets. With your bakeware selected and your oven dialed in, you’ve set the stage for success. Stick around, because up next, we’re turning up the heat and preheating our way to poultry perfection. Remember, patience is a virtue, especially when it’s about to get toasty in here!
Oven-Tempering Tactics
Alright, kitchen warriors, buckle up ’cause we’re about to crank up the heat – literally. Preheating your oven is like rolling out the red carpet for those primo chicken cutlets. You wouldn’t start a road trip without warming up the car in the winter, right? Same goes for your oven. Let’s talk turkey, or, well, chicken in this case.
Finding the Ideal Cooking Temperature
First things first – getting that dial just right. Most recipes will shout a number at you like it’s the secret code to Fort Knox, but here’s the scoop: somewhere between 350°F (that’s about 175°C for my metric friends) and 400°F (204°C) is your sweet spot. Lean towards the higher end for thinner cutlets looking for a suntan, or drop it lower for those thick boys that need a slow and steady warmth. And hey, don’t even think about skipping the preheat – unless you enjoy unevenly cooked surprises. No, sir!
The Waiting Game: Preheating Patience
- Turn on the oven and resist the urge to just chuck those cutlets in. Give it a solid 10-15 minutes to reach full temp. Trust me; patience is a virtue that pays off in tender, juicy chicken dividends.
- If your oven has a preheat setting, use it. It’s like having a butler politely tell you when it’s time to get the party started.
Even Heat Distribution Tips
Now, if your oven is one of those that plays favorites with hot spots, you might want to consider rotating your tray midway. Not all ovens are created equal, and some frankly have a mind of their own. Keep an eagle eye on those cutlets and show ’em who’s boss.
And just when you think you’ve nailed it, don’t forget to check out our sister guide on how to cook frozen burgers on the stove. Because, let’s be honest, who doesn’t love a good burger-night backup plan?
So, you’ve primed your oven and it’s humming with anticipation. What’s next? Hang tight because we’re about to dive into the delicious depths of marinating maxims. Your taste buds will thank you. Keep that dial locked, and let’s infuse those cutlets with flavor that’ll knock your socks off in the next section!
The Marinating Maxims: Infusing the Cutlets
Hey there, fellow flavor fanatics! Let’s dive right into the magical world of marinating – it’s like sending your chicken cutlets to a spa, and the results? A taste transformation that’ll knock your socks off 🧦🚀. Now, don’t just dunk your chicken in any old liquid and call it a day – there’s an art to this flavor-infusing fiesta.
Time Frames for Flavor Penetration
Oh, I see you, eager beaver, ready to marinade, but hold your horses! The key here is timing. You might think longer is better, but like a good sit-com, you don’t wanna drag it on. A quick 30-minute soak is all you need for a flavor-kissed quickie, ideal for those impromptu dinners. Going for depth? Overnight in the fridge will do the twist, especially with heartier herbs and spices.
DIY Marinades That Impress
Roll up your sleeves, ’cause we’re mixin’ our own blends! Start with an acid – lemon juice or vinegar, it’s your rodeo – add some olive oil, and then slide in the spices. Got garlic? Chop it in. Adore herbs? Rain ’em down. For a sweet meet heat situation, fuss around with honey and chili flakes. Trust me, you can’t mess this up unless you forget it altogether. You’re crafting a marinade masterpiece, and your cutlets are the canvas.
Shortcuts for the Marinade Minimalist
- Pre-Mixed Power: Life’s busy, I get it. Grab those pre-mixed marinades from the store, and you’re off to the races.
- Baggie Method: Pop your cutlets and marinade in a Ziploc, squeeze out the air, and let the fridge do the work while you Netflix and chill.
- Brush & Broil: In a crunch? Brush on your marinade right before you chuck ’em in the oven. Some flavor’s better than no flavor, right?
Remember, folks, your patience will be rewarded with a dish that’s high-fives all around ✋✋. As you whisk away into this marinade adventure, think of the sizzle that awaits. Will it be Mediterranean zest or an Asian twist? Whatever you pick, make sure you’re ready to move on to the next step – cutlet placement and timing – cause nobody likes a kitchen cliffhanger.
| Ingredient | Flavor Profile | Marinade Time |
|---|---|---|
| Lemon Juice | Zesty and Fresh | 30 min – 2 hrs |
| Balsamic Vinegar | Rich and Tangy | 1 – 4 hrs |
| Soy Sauce | Savory and Umami | 2 – 12 hrs |
| Garlic | Bold and Pungent | 30 min – Overnight |
So, after the time has ticked and your cutlets are marinated to perfection, we’ll be laying them out for the grand finale in their cooking journey. Stay tuned, and keep that flavor flag flying high!
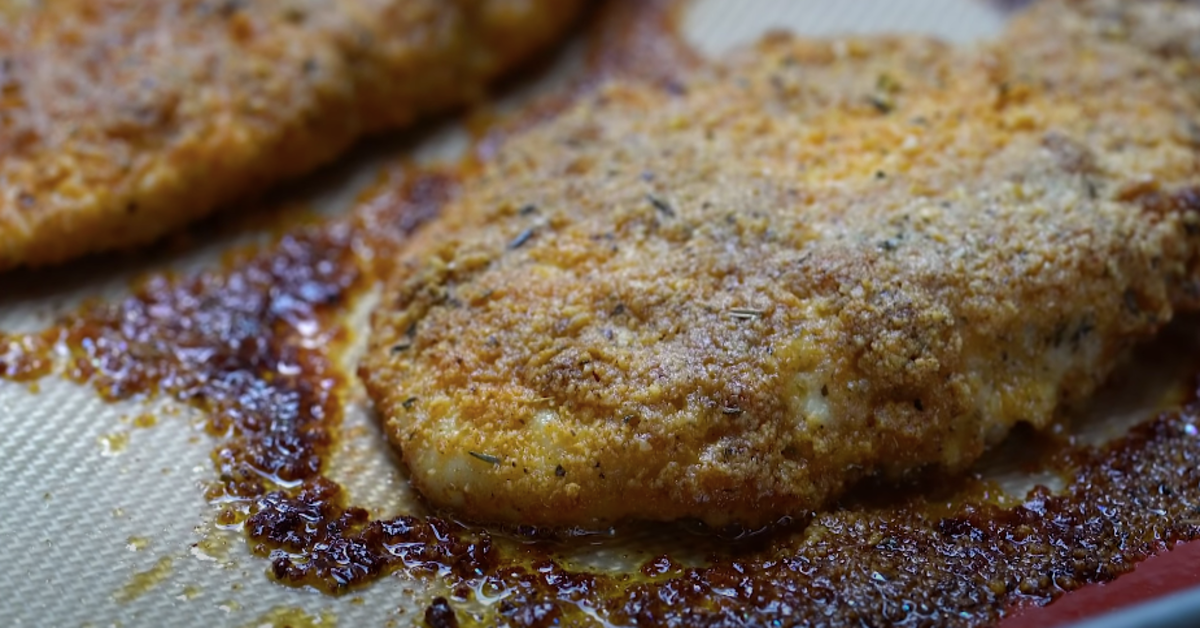
Laying It Down: Cutlet Placement and Timing
Alright, kitchen comrades, fasten your apron strings tight because it’s showtime for our pampered poultry. Now, don’t crowd those beauties; give them space to sizzle! Think of it this way: ever been to a packed concert? No one can boogie if there’s no room. It’s the same with our cutlets – they need elbow room on the tray to get that golden tan.
Spacing for Supreme Sizzle
- Ensure each cutlet has its own personal bubble. About an inch should do the trick.
- Direct contact with the pan equals direct heat, which equals deliciousness.
Clockwork Timing for Perfect Doneness
Oh, and timing? It’s not just for stand-up comedians and rocket launches. Use a timer to avoid those overcooked, rubbery regrets. Generally speaking, a solid game plan is around 20-30 minutes at 375°F for average-sized cutlets. But hey, remember – ovens are as unique as snowflakes, so keep an eye out!
Flipping Fundamentals
Don’t just set ’em and forget ’em; flip those cutlets halfway through. It’s like turning your pillow to the cool side – it keeps things crispy and even. Now, equipped with your spatula, channel your inner kitchen ninja and gently flip each cutlet to ensure that enviable crunch on both sides.
And just before we venture into Decoding the Aromas, let’s do a quick equipment check – got your tongs ready, folks? You’ll want to avoid a game of hot potato with those cutlets, trust me! In the next section, we’ll nose-dive into the wonderful world of olfactory excellence and learn to trust our senses as our chicken reaches its zenith of yum.
Decoding the Aromas: When Your Cutlets Call
Alright, my kitchen comrades, you’ve been following your nose since you were knee-high to a grasshopper – and for good reason. The smell wafting from your oven? That’s not just deliciousness; it’s a coded message telling you that it’s almost chow time. Let’s talk turkey—or chicken in this case—on recognizing the art of aroma.
Sensory Signs of Doneness
First things first, let’s put those sniffers to work. When your kitchen fills with a fragrant, mouth-watering scent that has you drooling like Pavlov’s pup, you’re on the right track. But remember, a fantastic smell doesn’t always mean your meal’s cooked to perfection – so keep your mitts off that oven door and let the scent tell its story while keeping the heat steady.
Color Cues and Juices Clues
Now, don’t get me started on the visual splendor of a golden-brown cutlet; it’s enough to make your heart sing, amigos. Poke your head in (carefully, now—don’t singe those eyebrows) and catch a glimpse. Is it a uniform honey hue all over? You’re golden -literally. But wait, there’s more! Give those beauties a gentle poke; if the juices run clearer than my Uncle Joe’s moonshine, you’re looking at prime time deliciousness.
Using a Meat Thermometer as Your Sidekick
- Tip the scales of kitchen victory in your favor with this nifty gadget.
- Insert that probe into the thickest part, but don’t go hitting the bone – that’s a rookie mistake!
- Looking for a magic number? Aim for 165°F – that’s when those cutlets are not just cooked; they’re a masterpiece.
Remember, texture and firmness are like the secret handshake of the poultry club. A finished cutlet will feel firm but not as tough as the sole of your running shoes. Give it a gentle press; if it bounces back, like your mood on payday, you’re in for a treat.
And before ya gallop off into the sunset, let’s think about the segue into our next kitchen adventure: what do you do once your cutlets are whispering sweet nothings saying they’re ready? Well, you rest ’em, friend. Give ’em a brief respite, like a spa treatment for meats. Stay tuned for the next step – it’s essential!
FAQs: Everything Oven-Baked Cutlets
Alright, my foodie friends, it’s time we dish out the real-deal answers to those head-scratchers we all ponder while whipping up those oven-baked wonders. 🧐
To Bread or Not to Bread
I know, I know, we’re all thinking it—do these cutlets need an extra crunch? Well, let me put it this way, breading is like the glitter of the culinary world; it ain’t always necessary, but boy does it shine when you bring it to the party! If you’re in the mood for a little razzle-dazzle, dip those cutlets into some eggs and breadcrumbs, and let’s get that party started! 🎉
Seamless Storage Solutions
Now, let’s talk leftovers (not that you’ll have any!). Wrap those precious cutlet companions in foil or stash ’em in a tight-lidded container, and your fridge will keep ’em cozy. Pro tip: Cutlets are like fine wine—they need their space, so don’t stack them unless you’ve got a parchment paper chaperone.
Best Practices for Reheating Leftovers
When it comes to reheating, avoid nuking your cutlets into submission in the microwave—no one’s taste buds deserve that injustice. Instead, pop ’em back in the oven or toaster oven for a brief sizzle. Keep it low and slow, folks; 275°F should do the trick. Trust me, it’s worth the wait for that encore performance. 🍗✨
So, whether you’re breading like a boss, storing like a pro, or reheating with finesse, mastering these tips will have you sailing the high seas of cutlet cookery with ease! And remember, when in doubt, just ask yourself, “What would the Cutlet Connoisseur do?” Till next time, keep your ovens toasty and your spirits high! 🥂
Thanks a bunch for stopping by my kitchen corner—until our next culinary escapade, keep those forks ready and your aprons on point!