
Unveiling the Secret to Spicy Poultry Delights
Hey there, fellow spice connoisseurs! Ever find yourself daydreaming about that tangy, lip-smacking Buffalo sauce? You know, the kind that’s the perfect mix of heat and zing, making your tastebuds do a happy dance? Well, buckle up, ’cause we’re about to dive headfirst into the saucy world of spicy poultry delights!
The Allure of Tangy Buffalo Sauce
Let’s chat about that fiery elixir that brings life to any dreary meal. Buffalo sauce isn’t just a sauce; it’s a way of life for some of us, right? Whether you’re slathering it on wings or dousing your fries, that tangy kick is like a party for your mouth. And don’t even get me started on the way it clings to the chicken like your favorite pair of jeans. 🌶️✨
Ingredients Collection: Beyond the Basics
- First off, you gotta snatch up some fresh cayenne peppers—the soul of any Buffalo sauce.
- Then, grab some vinegar, garlic powder, and a smidge of worcestershire sauce (yeah, the one no one can pronounce).
- And of course, you can’t forget the butter. Not margarine, people—butter! It’s what mellows out the heat and hugs your chicken in velvety smoothness.
Kitchen Tools: What’s Essential
We ain’t needin’ no fancy gadgets to whip up this saucy masterpiece. Just grab a trusty saucepan and a whisk. The whisk is your magic wand to ensure that all your ingredients mingle together as seamlessly as old friends at a high school reunion.
So, there you have it, my foodie friends. A peek into the starter kit for homemade Buffalo magic. Stay tuned for the rest of this culinary adventure, where we’ll go from sauce to sensational with tips and tricks for the perfect chicken tenders. And hey, don’t be afraid to throw in your own twist—’cause that’s what cooking’s all about, right? Jazzing things up and making it your own! 🍗💃
Preparing Your Chicken: A Journey to Tenderness
Alright, folks, let’s talk turkey—or rather, chicken. Now, I ain’t no culinary rookie, but every time I prep poultry for some finger-licking Buffalo chicken tenders, I learn something new. So let’s slice, dice, and everything nice our way to tender town!
Slicing techniques for perfect tenders
First off, you wanna start with a sharp knife—dull blades are the enemy of the perfect cut. And trust me, your tenders should look like they’ve been on a strict gym routine: lean and even. Aim for strips about half an inch thick; this ain’t a job for the heavy-handed. Remember: precision is key!
Bathing poultry in buttermilk bravado
Next up, we’re dunking these bad boys in a buttermilk bath. Why buttermilk, you ask? This tangy liquid does some sort of voodoo magic, tenderizing the chicken like a charm. Let them soak, folks—overnight is best, but if you’re pressed for time, a couple of hours will do the trick. Just don’t rush it; patience pays off in tenderness, I swear.
Seasoning: A dance of spices
Now, here’s where things get spicy—literally. We’re not just tossing salt and pepper over our shoulder for good luck; we’re crafting a symphony of spices. Think garlic powder, a touch of smoked paprika, and heck, maybe a whisper of cayenne if you’re feeling devilish. Coat your tenders evenly, and don’t be shy. These spices are the backup dancers to our Buffalo sauce’s lead singer, so make ’em count.
And there you have it, folks, your chicken is primed and ready for the spotlight. Just a few simple steps and voilà, you’ve got yourself some tender, spice-bathed future stars of your Buffalo extravaganza. Stay tuned for the next chapter where we’ll dive into the saucy world of Buffalo dressing. But for now, keep those tenders tender, and your spice game strong!
Crafting the Iconic Buffalo Sauce
Hey there, fellow flavor seekers! Who’s ready to dive into the saucy world of Buffalo greatness? Now, I ain’t no hot sauce sommelier, but I’ve got a few tricks up my sleeve that’ll have you whisking up a storm. You ready? Let’s get that kitchen smelling like a wing joint on game day!
The Art of Balance: Heat Meets Buttery Bliss
Okay, so, it’s all about that perfect yin and yang, folks. You want your sauce to pack a punch but not KO your taste buds, right? Start with a hot sauce that makes you happy – I’m talking about a sauce that gives you a warm hug, not a fiery slap. Now, here’s the kicker – butter. It’s like the bassist in a rock band; doesn’t always get the glory, but oh boy, does it bring everything together. The butter’s gonna smooth things out and add a rich, velvety texture that’s just divine.
Customizing Spice Levels to Your Palette
Listen, not everyone can handle the heat, and that’s cool! Add the hot sauce incrementally, tasting as you go along – keep it mellow or crank it up until your eyebrows sweat, your call. And hey, if you mess up and it’s too hot, a touch more butter or a splash of honey will bring it back from the brink!
Whisking Up a Storm: Achieving Smooth Consistency
- Start Cold: Begin with room temperature butter; melting it slowly into the sauce ensures a smoother blend.
- Steady Whisking: As you add the hot sauce to the butter, whisk like you’re trying to get to the eye of a flavor tornado – it’s all about the emulsion, baby.
- Low and Slow: Patience is key! Keep the heat low to avoid separating the sauce; you want it glossy, not greasy.
There you have it, my culinary compadres, the blueprint to a killer Buffalo sauce. Remember, the best sauce is the one that makes your taste buds do the tango. So go on, grab that whisk and make some magic!
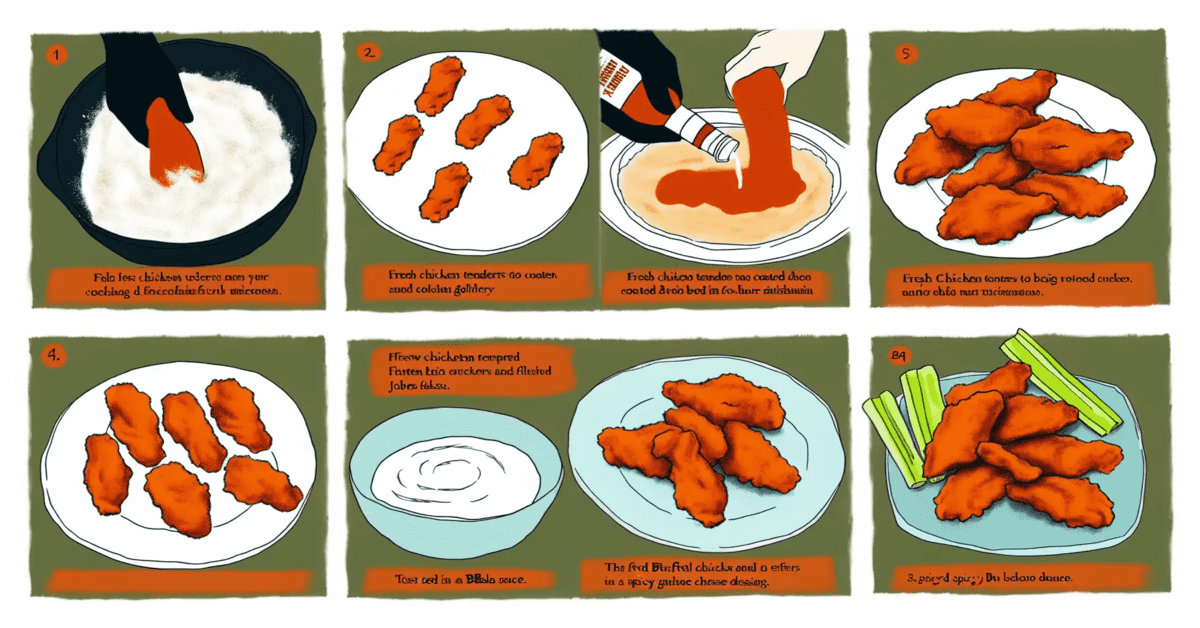
The Breading Procedure: A Crispy Transformation
Alright, folks, let’s roll up our sleeves and dive into the world of breading – not to be confused with breeding, which is a whole ‘nother ballgame! We’re aiming for that golden, “I can’t believe it’s not takeout” crunch. Now, let me tell ya, choosing your coating is like picking a favorite child – tough, but deep down, you know there’s a winner.
Choosing Your Coating: Panko vs. Traditional Breadcrumbs
So, you’ve got Panko breadcrumbs, the cool, crunchy hipsters of the breadcrumb world, and then the traditional ones, as reliable as an old pickup truck. Panko gives you an airy, audacious crunch that’s hard to rival. But hey, if you’re a purist, go for traditional – they’ll never let you down. Remember that time Aunt Marge made those tenderloins? She swore by traditional crumbs, and you’re still dreaming about ’em!
Ensuring Even Coverage: Tips and Tricks
- Season like a pro: Before you even think about breading, make sure those tenders are seasoned to the high heavens. We’re talking about a symphony of spices here!
- Use the dry-wet-dry method: Start with flour, dip in beaten eggs, and then end with breadcrumbs. It’s like a spa day for your chicken, only crunchier.
- Press down firmly: When you’re packing on those breadcrumbs, pretend you’re giving your meat a little deep-tissue massage. It’s all about getting them to stick.
The Double-Dip Method for Extra Crunch
Ever heard of double-dipping? In the breading world, it’s not just allowed; it’s encouraged! Go back for a second dunk in the egg and another roll in the crumbs. Your chicken will thank you with every bite that sings a crisp, savory tune.
Now, listen up, ’cause here’s the kicker: you can’t rush art, and breading is no exception. Take your time and let each piece get its moment in the spotlight. By the time you’re done, you’ll be staring at a tray of chicken tenders so beautifully breaded, they could make a grown man cry. And just remember – if it’s worth breading, it’s worth breading right!
Frying to Perfection: Golden and Crisp
Okay, folks, here’s where things get sizzling! Are you ready to transform your chicken tenders from soggy to spectacular? Let’s dive into the fryer’s universe and crank up the heat – it’s showtime for those tasty tenders! 🍗
Mastering the Oil’s Temperature
First things first, you gotta hit the sweet spot with your oil temp. Too cold, and your chicken’s gonna be wearing an oil jacket (not a good look). Too hot, and bam! You’ll have the fire alarm serenading you. Aim for 350°F to 375°F – that’s your goldilocks zone, where magic happens.
- Pro Tip: Use a trusty thermometer! Wingin’ it? Nah, that’s for birds.
Fry Time: When to Turn and When They’re Done
Toss those tenders in and wait for the sizzle – that’s when you know you’re on the right track. Keep an eagle eye on ’em and give ’em a turn at about the halfway mark. You’re looking for a golden-brown suit of armor – typically takes about 3-4 minutes per side, depending on thickness.
- Remember: Color’s key! If they’re looking pale, they ain’t ready for the gala.
Draining Methods to Preserve the Crunch
Here’s the clincher – you need to let that oil say goodbye without making your tenders soggy. Solution? Wire racks are your new best friends. Let those golden gods rest for a hot minute on a rack over a baking sheet.
- A tidbit of wisdom: Paper towels are fine, but racks give that all-around air hug that keeps the crunch alive!
So there you have it, my spicy comrades, the roadmap to crunch town. Keep these nuggets of knowledge in your back pocket, and your tenders will be the talk of the town. Now go forth, fry fearlessly, and crunch on! 🔥
Tossing Tenders in Buffalo Goodness
Alrighty, folks, let’s talk about the most thrilling part of making buffalo chicken tenders – the toss! I mean, it’s basically a ceremony where those crispy little delights get baptized in that tangy, buttery sauce we all crave. 🌶️🍗 Now, hang on tight ’cause I’m about to spill the beans on how to nail this step.
Coating Mastery: Achieving an Even Layer
First things first, grab a big ol’ bowl. You’re gonna want room to work because this is no time for shy, reserved movements. Here’s my trick: Place the chicken in the bowl, pour the sauce over the top, then shimmy and shake the bowl with a little wrist action. This way, those tenders get covered evenly with all that saucy goodness.
And here’s a zesty tip for ya: don’t drown them like they’re taking a swimming lesson – a lil’ sauce goes a long way, okay?
Serving Suggestions for Maximum Enjoyment
After you’ve got those bad boys looking like shiny, saucy treasures, it’s time to think about the layup. Grab a platter, make it look pretty – let’s give ’em something to take a picture of before they devour it, am I right? 📸 Place those tenders with some intention, and voila, you’ve got yourself a dish that screams ‘eat me’!
My personal opinion? You gotta have the classics on standby – celery sticks and some creamy blue cheese dressing for dunking. It’s like the perfect cooling high-five for your taste buds after that spicy slapshot!
Pairing Dips That Complement the Fiery Kick
- Ranch dressing is a given, folks. It’s like the Robin to your saucy Batman – a truly dynamic duo.
- But hey, why not get jazzy and whip up a garlic aioli or, heck, a cilantro-lime crema? Both bring a fresh zing that cuts the heat and will have your guests thinking you’re some kinda culinary maverick.
And there you have it, my chicken-tender-loving compatriots! Master the saucy toss, pair with some killer dippers, and serve up a platter that’ll undoubtedly have ’em coming back for seconds before their mouths have even cooled down. 🌡️️🔥 Remember, balance is key; we’re makin’ memories here, not just meals!
Serving Suggestions to Enthuse the Table
Alright, folks, ever find yourself staring at a plate of Buffalo chicken tenders, wondering how to make it look like less of a hot mess and more like a hot dish? Well ya know, presentation ain’t just for those highfalutin’ gourmet places—you too can turn your kitchen into an art studio with a few simple tips.
Let’s not beat around the bush here, we eat with our eyes first. So, plating aesthetics are key! Try to find a canvas (ya know, a plate) that makes those chicken colors pop. I’m talking about contrast, baby! A pure white dish is a classic choice, but hey, if you’re feeling bold, go dark—a slate plate can really make that sauce shine. 💅
Lay those tenders out like they’re sunbathing on a beach – give ’em some space, let ’em breathe! Nobody likes a crowded beach—or plate.
Now, onto the salad pairings. Think of these greens as the Robin to your Batman—they’re there to support. “But salads are boring!” Oh c’mon, not if you do it right. Spice it up with a zesty carrot slaw or a crisp apple and walnut salad for that refreshing crunch. It’s all about that ying and yang, the hot and cool, the crispy and crispier. 😎
And for the love of taste buds, let’s tone down the heat for a sec with some carb action. A slice of fresh, crusty bread or a soft dinner roll—now that’s what I call carb coupling. It’s not just a buffer for heat, but oh, it soaks up that buffalo sauce like a little sponge of deliciousness. Carbs, in this case, are your friend – the ultimate peacekeeper between your mouth and the fire.
- Pro Tip: Wanna go the extra mile? Toast that bread a little. You’ll thank me later.
Whether you’re dining solo or impressing the pants off your guests (figuratively speaking, folks), these little tweaks to your Buffalo chicken tender ensemble are gonna elevate your meal from “meh” to “more, please!” And hey, if you find a combo that really rocks your socks off, don’t be shy—shout it from the rooftops! Or, you know, just tell your friends.
FAQs about Homemade Buffalo Chicken Tenders
Alright, folks, you’ve mastered the art of creating mouth-watering Buffalo Chicken Tenders – congrats! But hey, don’t put away that apron just yet. We’ve got some burning questions hotter than your last batch of tenders! Let’s dive right in, just like those tenders into the sauce. 🔥✨
Storing Leftovers: The Encore They Deserve
Got leftovers? No problemo! Here’s the skinny: pack ’em in an airtight container and slip them into the fridge. They’ll be good for a few days – perfect for a midnight raid when hunger strikes. Want to keep those bad boys crispy when you reheat? Oven’s your best bet. A few minutes at 375°F should bring them back to life. Just avoid the microwave, unless you’re into soggy tenders (no judgment, but…really?).
Turning Down the Heat: When Your Tongue Needs a Break
If you’ve got a tender tongue (see what I did there?) and can’t handle the heat, no worries! You can easily tone down the spiciness. Just go easy on the hot sauce, and buddy up with butter. Heck, throw in some honey if you’re feeling wild! It’s your kitchen, your rules. Aim for that “hmm, nice kick” instead of the “holy smokes, where’s the fire extinguisher” kinda heat.
Going Gluten-Free: Tenders for Everyone
For the gluten-free gang, you can still join the party! Swap out that regular flour for a gluten-free option – rice flour, almond flour, you name it. Just look out for gluten-free breadcrumbs or pulverize some GF cereal for that golden crunch. Voilà, tenders that love you right back!
Remember, the best part about making these tenders at home is making ’em your own. Play around, have fun, and dig in! If you’ve got any more Qs I haven’t As-ed, don’t be shy – drop me a line. And remember, there ain’t no thing like a chicken wing…err, I mean tender! 😅🍗
In closing, thanks for reading, tender-lovers! Keep your spirits high and your sauce spicy!
Catch ya on the flip side, where the tenders are always hot and the company’s even hotter! ✌️❤️