
So you’re ready to dive into the world of homemade venison breakfast sausages, huh? Well, buckle up, buttercup, ’cause we’re about to get into the nitty-gritty of pickin’ the prime cut. This ain’t your grandma’s meatloaf recipe – we’re talking the Mona Lisa of meats here!
Selecting the Prime Cut of Venison
Now, let’s talk turkey – or should I say, deer. When it comes to crafting those mouth-watering sausages, not just any ol’ cut will do. You gotta be choosy! I mean, we’re after that perfect blend of flavor and texture, and it starts with the right cut. Aim for the shoulder or the hindquarters – these spots are the gold mines for prime sausage material. Think of it like picking a fantasy football team; you want the best of the best.
- Why lean meat works best: Lean meat is the star quarterback of sausage-making. It’s packed with flavor and holds the seasonings like a champ. But don’t just take my word for it – give it a try, and watch the magic happen.
- The role of fat in sausage making: Don’t you go thinkin’ fat’s the enemy here; it’s actually your secret weapon! A smidge of fat keeps your sausages from tasting like a hockey puck. It’s all about balance – like a seesaw, you want just enough fat to keep things interesting without taking a nosedive.
- Best venison cuts for sausage: Remember, we’re playing for keeps. The shoulder and hindquarters offer that sought-after mix of lean and fat. You can practically hear the angels sing when you slice into these cuts!
Got your cuts picked out? Good. ‘Cause now it’s time to spice things up a bit! But hey, that’s a story for another day. What’s that? You’re curious about the perfect spice blend? Well, stick around, my friend – we’re about to embark on a flavorful journey where every pinch of seasoning tells a tale of its own. And trust me, it’s gonna be legendary!
Crafting the Perfect Spice Blend
Alright, fellow food fanatics, let’s dive into the nitty-gritty of spice alchemy for your venison breakfast sausages. Imagine waking up to the aroma of sage and thyme wafting through the house – it’s like a cozy blanket for your nose! But wait, there’s more than just your garden-variety herbs in this mix. Ever thought about adding a dash of smoked paprika or a whisper of nutmeg? Trust me, these little tweaks can elevate your sausages from “Meh, that’s good” to “Holy smokes, did an angel make this?” 🌿
When it comes to the essential spices for classic venison sausage, you can’t beat the holy trinity of sage, thyme, and black pepper. They’re the backbone, the OGs, the ones that’ll have your taste buds fist-bumping in delight. Now, if you’re feeling adventurous, there’s a world of exotic spices out there just begging to be explored. A smidgen of coriander or a hint of allspice? Go for it! Just remember, it’s all about balancing flavors – we’re making breakfast sausage, not a spice drawer casserole.
But hey, don’t just take my word for it. Have a look at this recipe for vegan pandan cookies – it’s a prime example of how a unique ingredient can steal the show! Just like pandan ups the ante in those cookies, your secret spice can be the showstopper in your sausages.
Now, let’s talk about the art of the blend. First, you’ll want to start with fresh, high-quality spices – because, let’s face it, that ground sage that’s been sitting in your cabinet since the Clinton administration probably isn’t going to cut it. Get yourself some whole spices, toast them lightly if you’re feeling fancy, and grind them up. This extra step? Game-changer. The flavors are more intense, more robust, and just plain better.
And before we move on to transforming those spiced-up cuts into the glorious grind, here’s a quick pro tip: write down your spice mix ratios. Nothing’s worse than nailing the perfect blend and then forgetting how you got there. Been there, done that, didn’t even get a t-shirt. Alright, let’s get grinding – and by that, I mean literally grinding the meat. Onward!
Grinding Venison into Sausage Filling
Ever felt like a magician transforming something good into something magical? Well, buckle up, folks, because grinding venison into sausage filling is where the culinary alchemy happens. And let me tell you – it’s nothing short of spectacular.
First things first – optimal grind settings for venison. You’re aiming for a texture that’s not too fine, not too chunky. Just like your favorite coffee grind, but for meat! You want the meat to marry the fat just right. Now, this isn’t the time to go rogue; keep to a medium grind to start. You can always go finer if the mood strikes, but it’s all about that initial coarseness.
- The art of combining fat with meat is, well, an art. You’re looking for a ratio that sings – usually, about 20% fat to that gorgeous lean venison. It’s like finding the right rhythm in music – when it’s balanced, it’s a beautiful thing.
- Now, when you’re set up and ready to grind, here’s a pro tip for you – keep everything cold. I mean, chilly. The colder the meat and equipment, the cleaner the grind. A smooth grinding session is practically a zen experience. We’re talking no smearing, no mushiness, just pure grinding bliss.
But hey, what if you’re thinking, “What’s the rush?” Well, there isn’t one. Take your time with the grind. You’re not just making sausage; you’re creating breakfast memories, my friend.
Tips for a Smooth Grinding Session
You’ve got your meat and fat chilling in the fridge, your grinder’s assembled, and you’re ready to rock ‘n’ roll. But keep a few tricks up your sleeve:
- Partially freeze your venison for that firm, easy-to-grind texture.
- Sharpen those blades. Dull blades are a no-go. They’ll tear your meat apart like a bad breakup.
- Stay cool. Literally. If your meat’s warming up, take a break. Toss it back in the freezer.
And there you have it, a grind that’s smoother than a jazz saxophonist on a Saturday night. But don’t stop now; we’re just getting warmed up!
Onward and upward, my culinary comrades, as we march toward the tantalizing world of sausage casings. It’s where your freshly ground venison will find its new, tubular abode. So, stick with me – we’re about to get all up in those casings’ business.
The Art of Sausage Casings
Alright, folks, let’s talk about the unsung hero of our sausage saga – the casings. You might think they’re just a shell, but boy oh boy, they’re so much more! They’re the difference between a good sausage and a great one. So, how do we pick ’em, and what’s the deal with getting them ready? Let’s dive in.
Natural vs. Synthetic Casings
You’ve got two paths here: natural or synthetic. Natural casings are the old-school way, made from, well, the intestines of sheep, pigs, you name it. They give that snap when you bite into them; it’s like music to your taste buds. On the flip side, synthetic casings, made from collagen or cellulose, are the modern maestros – consistent and easy to handle. But let’s be real, they lack that je ne sais quoi that the natural ones flaunt.
Preparing Casings for Filling
It’s prep time! If you’re going au naturel, you’ll need to soak and rinse those casings well. Nobody wants a sausage with a side of salty surprise, right? With synthetic buddies, just follow the manufacturer’s steps; they’re typically ready to go straight out of the pack.
Tricks to Avoid Tears and Bursts
It’s a delicate dance, this casing business. Gently unfurl your casings onto the stuffer’s nozzle. If it feels like you’re diffusing a bomb, you’re doing it right. Go slow; any rush job might lead to a blowout, and nobody invited sausage casing confetti to this party. And here’s a nugget of wisdom – oil ’em up! A little lubrication can go a long way in keeping those tears at bay.
- Be gentle: Think of casings as fine silk. Handle with care!
- Lubricate: A dab of oil helps casings slide on without a hitch.
- Don’t overfill: Leave a bit of room so the casing can expand while cooking.
And hey, if you’re looking for ideas on what to do with your finished product, check out how you can incorporate them in the leftover fried chicken article. Spoiler alert: it’s delicious.
Next up, we’re going to get our hands dirty – quite literally. We’re moving on to the thrilling world of stuffing the sausage. You’ll feel like a kid in a candy store, only this time, it’s meaty goodness we’re filling those casings with! So, grab your stuffer, and let’s get to it!
Stuffing the Sausage Like a Pro
Alright, amigos! You’ve got your venison ground finer than the sands on a Floridian beach—it’s time to get down to the nitty-gritty business of stuffing those sausages. And hey, isn’t this just the quintessential moment where you feel like a genuine craftsperson in the old-world tradition of sausage making? I mean, come on, it’s not every day you get to play meat architect!
First off, you’ve gotta be as gentle as a butterfly landing on a daisy. Rushing through this process? Big no-no, my friend. You wanna fill those casings evenly, ensuring there’s no room for those pesky air pockets that can ruin the game.
- Even Steven: Aim for consistency. You want every bite to be as impeccable as the next. A sausage stuffer, preferably with a foot pedal, is primo for keeping your hands free to manage the casings.
- On The Tools: Whether you’re going old school with a hand-crank or high-tech with an electric stuffer, the goal is the same — smooth sailing sausage stuffing.
- Easy Does It: Overzealous stuffing leads to burst casings and kitchen catastrophes. Keep it relaxed like a Sunday morn.
“When you’re stuffing sausages, imagine you’re filling a water balloon. You want it full, but not bursting at the seams!” – Some wise, old sausage sage 🧙♂️ (probably).
Pro tip: Keep a toothpick handy. If you’ve got a bit of air trapped, a gentle poke can be the quick fix you need.
As you’re conquering the art of stuffing, remember, it’s not just about getting the meat in the casing; it’s about creating a succulent vessel for those herbs and spices that have been judiciously selected. And while you’re doing the hokey pokey with your sausage, don’t forget to twist those links. It’s about giving each piece its own little territory while keeping that flow going.
Avoiding Overfilling and Air Pockets
| Do’s | Dont’s |
|---|---|
| Gentle pressure | Manhandling the meat |
| Regular casing inspection | Ignoring signs of strain |
| Twisting at even intervals | Random twist frenzies |
And with that, you’re set to macgyver your way through the sausage stuffing saga. Once you’ve lovingly entombed your ground venison in its casing cocoon, you’ll be prepped to sizzle those bad boys to golden perfection—but hey, that’s a tale for the next section. Stay tuned, sausage superstar, we’re just getting warmed up!
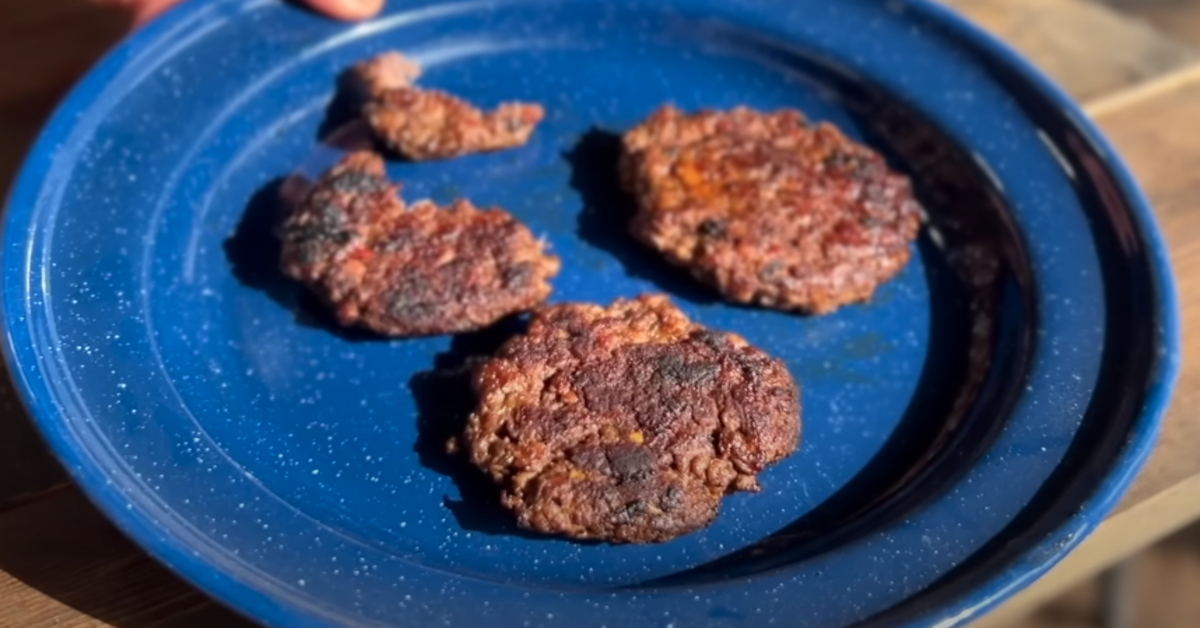
Proper Cooking Methods
Alright folks, imagine this: you’ve spiced, ground, and stuffed your venison breakfast sausage to perfection. What’s next? Ah, yes – the cooking! Don’t sweat it, I’ve got the skinny on the best ways to cook these beauties without losing an ounce of that juicy flavor or getting a charred mess.
Pan-frying for a Crisp Exterior
Nothing beats the sizzle of sausage in a pan, am I right? Grab your cast iron skillet (every seasoned cook’s BFF) and heat it up medium style. You want them to sizzle, not send smoke signals! Keep ’em turning for an all-around golden brown crispiness. And hey, who doesn’t love that “just-came-off-the-griddle” taste?
Baking for Convenience and Health
More the “set-it-and-forget-it” type? Baking your venison sausage might just be up your alley. Lay those links on a tray, and slide ’em into a preheated oven. It’s lower in fat than frying and just as tasty. Just make sure you’ve got the patience of a saint, as the heavenly aroma fills your kitchen. Bonus points: You can multitask while they bake – just don’t forget the timer!
- Preheat your oven
- Place sausages on a tray
- Bake ’em to golden perfection
Ideal Internal Cooking Temperatures
Now, let’s talk turkey—or, venison, rather. You want to hit the sweet spot with the internal temperature. Use a meat thermometer and aim for 160°F (71°C). This isn’t just for taste; it’s about food safety first and foremost. You certainly don’t need an unexpected trip to the doc derailing your sausage soiree.
So you’ve got your sausages cooked just how you like ’em, but how do you store these bad boys? Hang tight, ’cause we’re jumping into all the deets on keeping your homemade venison sausage fresh and fabulous in the next section!
Storing Homemade Sausage Safely
Alright folks, once you’ve inhaled that tantalizing aroma of home-cooked venison sausage and practically devoured the entire batch, it’s time to talk leftovers. Yup, that’s right – if there are any! Let’s be real, we’re not always feeding a hoard of hungry lumberjacks, so knowing how to properly store those extra links is key to savoring the flavor for another day. First things first, cool it – and I mean that literally. Let those sausages hit room temp before you even think about stowing them away.
- Short-term Refrigeration Tips: Planning on wolfing down those sausages within a couple of days? Slide them into the fridge, but listen up – don’t just chuck them in uncovered. Wrap them snug in plastic wrap or tuck them into an airtight container. We’re not trying to let them dry out like last year’s Thanksgiving turkey.
- Long-term Freezer Storage Strategies: Alright, for those of you playing the long game, the freezer will be your best bud. Here’s the kicker – wrap each sausage individually in plastic, then give ‘em the ol’ double-wrap with aluminum foil or slide them into freezer bags. Squeeze out the air – think of it as giving the sausage a little hug goodbye.
- Thawing Techniques for Best Taste: Ready for round two? Thaw those babies like a pro – in the fridge, overnight. Resist the microwave temptation; it’s a gamble, and nobody wants to lose when it comes to sausage.
Remember, keeping moisture out is like blocking spam emails – absolutely necessary. It prevents freezer burn, and nobody’s got time for that. Speaking of time, you’ve got to date those sausages, folks. Stick a label on them with the freezing date – don’t trust your memory, trust me on this 😉.
Now that you’ve got the 411 on keeping your sausages safe for later, you’re probably itching to know what to do with ’em next, right? Hang tight, ’cause we’re about to dive into the cooking process that’ll make your mouth water…again.
FAQs about Venison Breakfast Sausage
Alright, pals, let’s dive into a little Q&A session for all you budding sausage aficionados out there 😊! Venison breakfast sausage can be a bit like your unpredictable uncle – you love it, but sometimes it just throws ya a curveball when you least expect it.
Balancing Fat Content for Different Tastes
First off, I know you’ve been asking, “How much fat is too much?” Let’s not skirt around the topic: Fat is your friend – in moderation, of course. A good thumb rule? Aim for about 20% fat in your sausage mix. Less than that, and the venison might start resembling a leather boot rather than a juicy sausage. More, and you’re entering greasy territory, pal. It’s about hitting that sweet spot.
Dealing with Gamey Flavors in Venison
And oh, that infamous gamey taste. Some love it; some don’t. If you’re lookin’ to tone it down, marinate your venison in buttermilk or throw in some acidic ingredients like vinegar or lemon juice before you grind. These little tricks can help take the edge off faster than grandpa at a hoedown!
Best Practices for Seasoning and Curing
- Don’t be shy with the seasoning; herbs and spices are your ticket to flavor town. Salt’s important, but don’t overdo it – about 1.5% of your meat weight should do the trick.
- Got fresh spices? Use ’em! They’ll bring your sausage to life in a way that bottled ones can only dream of.
- Curing’s not just for ol’ timey folks. A little bit of curing salt (sodium nitrite) will not just up the flavor but also keep things safe. Follow the package directions, though – too much, and you’re in a pickle.
So there you have it, sausage squad. You’re now equipped with the know-how to tackle any breakfast sausage blues. Remember, making sausage is like life – sometimes messy, occasionally unpredictable, but always worth it!
In closing, keep on stuffing those casings and remember: Every sausage is a story, make yours a bestseller 👊!
Thanks for reading, and don’t forget to share your sausage success stories – I’ll be rooting for ya! Keep your forks quirky and your griddles hot! ❤️ 🍽️