
Choosing Your Ingredients Wisely
Alright folks, let’s get down to the nitty-gritty of building our fantastical castle cake. But hold your horses—before we start constructing turrets and moats, we’ve got to talk about the foundation: ingredients. Think we can just grab any ol’ flour and call it a day? Nope, not if we want our guests curtsying and bowing to our baking brilliance!
Quality Counts: Picking the Best Flour and Cocoa
Ever heard the saying, “you are what you eat?” Well, your cake is what it’s made of! Opt for the good stuff—unbleached, all-purpose flour is a safe bet for a structure that’s more stable than your Aunt Edna’s hairdo at a Texas wedding. And don’t you dare go for that bottom-shelf cocoa—look for a high-fat cocoa powder that’ll make your cake richer than Uncle Bob who won the lottery (and never lets anyone forget it).
The Baking Arsenal: Essential Tools for the Perfect Texture
You wouldn’t go to a knight’s joust with a pool noodle, so why bake with subpar tools? Arm yourself with some quality baking pans—those bad boys should be as heavy-duty as your enthusiasm for medieval architecture. A trusty mixer, scale, and measuring spoons that actually measure are your trusty steeds in this joust.
From Sweet to Sumptuous: Flavor Enhancers That Wow
Let’s not settle for just “sweet”—we want flavors that’ll smack you into next Tuesday! A dash of vanilla extract is a must, but how about a pinch of almond extract for a nutty knock-out? Oh, and zesting a lemon like it’s nobody’s business could brighten up your batter faster than a court jester’s antics.
Choosing your ingredients is like gathering your loyal knights before a battle. Make sure they’re the best you can muster, and your castle cake will stand tall and proud, ready for whatever dragon-shaped piñatas come its way. Now, let’s saddle up and ride boldly into the domain of designing your dream castle cake—where creativity knows no bounds and every sugary stone is a stepping-stone to deliciousness. Just remember, this is only the beginning of our cake chronicle. Stay tuned, my liege of the oven mitts, for our next valiant venture: sketching the blueprint of your grandiose gateau!
Designing Your Dream Castle Cake
Hey there, fellow bakers and dreamers! Ever found yourself daydreaming about magical feasts and confections that look like they’ve popped right out of a storybook? Well, you’re not alone. Now, before we get our hands doughy, let’s talk about crafting the castle of your sweetest fantasies. After all, before the baking, comes the making… of plans, that is!
A Vision on Paper: Sketching Your Cake Blueprint
First things first, grab yourself a pencil and let your imagination gallop away with you. Will your cake have a moat with candy-coated fishes or perhaps a marshmallow parapet? Sketching a blueprint, even if stick figures are more your style, can help bring that cake castle out of the clouds and onto the cake stand.
- Remember, the eraser is your friend – tweak and toil until your heart’s content!
- Consider the number of layers – higher isn’t always mightier if you want to avoid cake-tastrophes.
Online Inspirations: Sites for Fairytale Creations
Next up, let the virtual world be your oyster. Scour the internet for castles that make you go ‘Wow!’ Whether it’s Pinterest, Instagram, or good ol’ Google images, there’s no shortage of fantastical designs ripe for the pickin’.
The Details: Choosing Themes and Color Schemes
Now, let’s talk themes. Are we thinking Cinderella at midnight or more Game of Thrones at dawn? Pick a color scheme that’ll make your guests’ eyes pop. Silver dragees for a touch of elegance, or bold red fondant for drama, perhaps? Your theme sets the tone, so let those creative juices flow!
- Match your colors to the occasion – pastels for a soft, romantic touch or vibrant hues for a party that’s popping.
- Textural elements like piped icing can add a touch of realism to your castle walls.
And remember, folks, after all this design delight, we’ll be moving on to the nitty-gritty of crafting the cake architecture. So, keep that sketchpad handy, and let’s get ready to build a foundation as strong as your royal aspirations!
Crafting the Cake Architecture
Alright, my fellow bakers, let’s roll up our sleeves and dive right into the nitty-gritty of crafting the cake architecture. This is where the rubber meets the road, or should I say, where the batter meets the oven! We’re building the foundation of our cake castle, and by golly, we need it to be as sturdy as the walls of Fort Knox. 😂
Stacking Secrets: Stable Layers for Majestic Heights
Now, I won’t sugarcoat it (pun intended)—layering cakes is akin to playing a delicious version of Jenga. One wrong move and it’s a topple-tastic disaster. But fear not! Start with the thickest, most even layers you can muster. And remember, a little frosting between layers is like cement; it keeps the peace and holds those layers together like besties. Just don’t go overboard, or you’ll have a slippery situation on your hands!
Trimming Techniques: Carving the Perfect Castellations
When it comes to trimming, you’re the sculptor and the cake is your marble. Carve out those iconic castellations with a serrated knife—gentle sawing motions, folks, no hacking! Think of it as giving your cake a stylish haircut; you’re aiming for those mesmerizing notches that’ll make onlookers think, “Did Michelangelo switch to pastry arts?”
Support Structures: Dowels and Straws as Silent Sentinels
- Dowels are your knights in shining armor, ready to defend against the gravity gremlins that love to cause cakey collapses.
- Straws, well, they’re the unsung heroes, providing hidden support without stealing the limelight.
- Place them strategically, like you’re plotting a game of Battleship, and you’ll ensure each layer of your cake castle can withstand the heaviest of fondant fortifications.
Once you’ve got those layers locked in place, it’s time to look ahead. Up next, we’re going to whip up some enchanting frostings and fills that’ll make this castle fit for a king—or queen, or heck, even a dragon if that’s who’s RSVPing to your shindig. So, grab that spatula and let’s get ready to spread some magic! 😄🍰
Whipping Up Enchanting Frostings and Fills
Alright, cake connoisseurs and frosting fanatics, let’s dive whisk-first into the heart of our castle cake: the mortar of the middle ages, better known as our frosting and fillings! Now, don’t you dare reach for that pre-made tub of who-knows-what. We’re craftin’ this from scratch, folks!
Buttercream Basics: Mastering a Smooth Outer Layer
When we talk about slathering on the good stuff, we’re talking buttercream that’s smoother than a troubadour’s serenade. But achieving that royal smoothness? That’s part art, part science. Begin with room temperature butter – it’s gotta be as soft as your slippers but not melty like your resolve to eat just one slice. Whip it up good and add your confectioners’ sugar gradually. This way, you won’t end up in a cloud of sugar dust. Voilà, you’ll have a buttercream so smooth you’ll want to spread it on everything, including your morning toast!
- Room temperature butter is key
- Add sugar gradually to avoid a sweet snowstorm
- Whip until light and fluffy for that perfect spreadability
Ganache Glazing: Achieving the Ultimate Sheen
Now, for the ganache that glistens like the crown jewels. Dark chocolate and heavy cream join forces to create a glaze so shiny, you’ll see your reflection in it. Heat the cream until it’s hot but not boiling – we’re not making a witch’s brew here. Then, pour it over your chocolate pieces and wait patiently. Stir it slowly until it’s silkier than a royal robe.
Fillings that Fascinate: Adding Layers of Flavor
Between each layer of our stately sponge, there’s an opportunity for oomph. Lemon curd for a tart take, raspberry preserve for a fruity fiefdom, or even a caramel drizzle for a sweet surprise. These fillings aren’t just flavorful; they’re the secret passages and hidden rooms of your cake castle, waiting to be discovered.
Now, don’t just stand there like a statue in the courtyard. Get mixin’ and spreadin’ because after this, we’re assembling the edible embellishments. And you thought the frosting was fun! Wait ’til we start on the sugary scrollwork and candy crenellations!
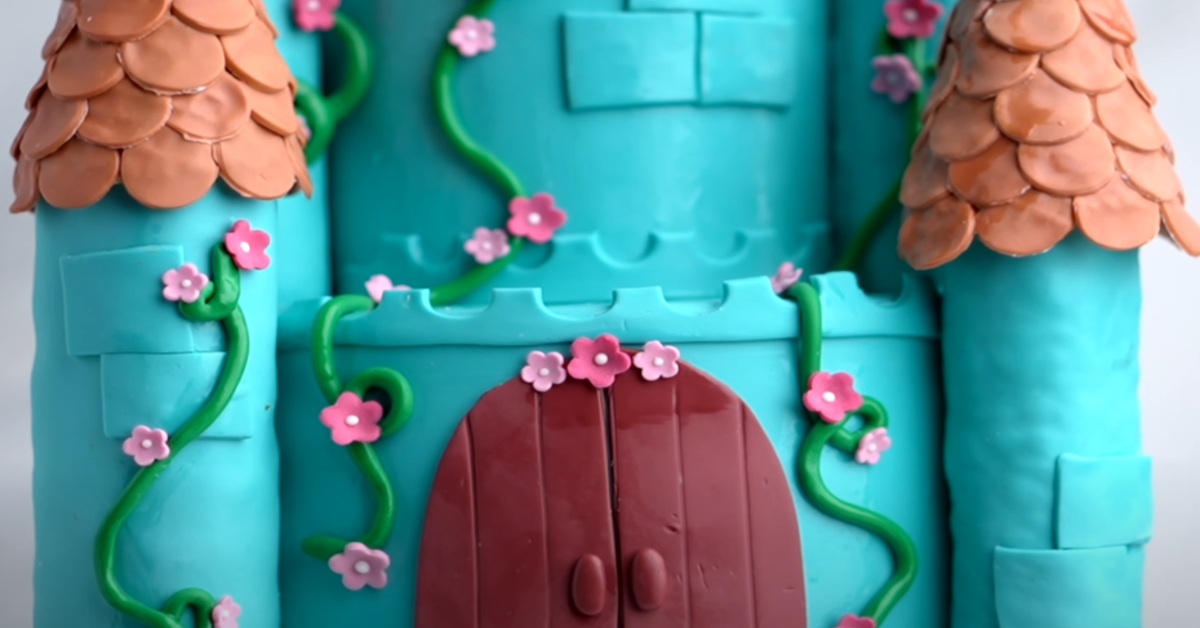
Assembling the Edible Embellishments
Hey there, fellow cake architects! Now that we’ve got our castle’s sturdy walls and towers, it’s time to jazz things up a bit—and by ‘jazz,’ I mean adorn our confectionery castle with some truly epic embellishments. We’re talking the magical touches that’ll have your guests declaring you the sovereign of sugarcraft!
Pastillage Panache: Windows that Wow
No cold, dark dungeons here—our windows gotta have that ‘whoa, is that even edible?’ factor. Using pastillage, a sort of glorified sugar dough that dries harder than a knight’s armor, you can create stunning stained glass effects or even add a touch of sparkle with edible glitter.
- Pro Tip: Roll it thin, cut it fancy, and let it dry completely—patience is key, my friends!
Sculpting with Marzipan: A Garden of Treats
Marzipan’s not just for those holiday fruitcake toppings; this almond paste is like the putty in Michelangelo’s hands. With marzipan, you can model cheeky little animals, flamboyant flowers, or anything that tickles your fancy.
- Get colorful: knead in some food coloring!
- Bust out your tools: precise carving calls for tiny spatulas, folks.
- Layer it on: marzipan sculptures make for fantastic cake toppers or side art.
Candy Creativity: Jewel-like Accents
For that crowning touch, as though your cake was touched by King Midas himself, turn to the candy aisle. Imagine peppermint pinnacles and gummy brickwork—suddenly, the mundane becomes magnificent!
| Accent | Sweets to Use |
|---|---|
| Pillars | Licorice Laces |
| Windows & Doors | Gummy Shapes |
| Rooftops | Halved Jelly Beans |
With these sugary shenanigans, who even needs a fairy godmother? Just remember, while you’re fashioning your fantasy fortress, the devil—or should I say dragon?—is in the details. Let your creativity go wild! Keep in mind, too, that the sturdier your embellishments, the more likely they are to last through the night.
And hey, once you’ve bedazzled your bake with bells and whistles, what’s next? Well, as night follows day, after the embellishments comes the grand assembly. That’s right, get ready to notch those turrets and hoist the drawbridge—your confectionery castle’s about to reach its dazzling crescendo! But more on that in our next sweet installment…
Constructing the Cake Battlements
Alright, my fellow bakers, let’s roll up our sleeves and turn those cake layers into a castle fit for a king—or queen! By now, you’ve got your cake layers as sturdy as foundation stones, and it’s time to notch those turrets and finesse that drawbridge. This is where your cake really starts to rise to the occasion.
Turret Triumphs: Building Towers of Wonder
- First things first, when you’re constructing your turrets, remember – structure is your friend. Use roll wafers or sugar cones for a quick and clever turret tip.
- Think outside the box when you’re stacking; alternating between cake and something sturdier like rice cereal treats can be the magic your castle needs to reach for the clouds without a pumpkin turning back into a carriage.
The Drawbridge: A Gateway to Awe
A drawbridge might seem like a medieval marvel, but it’s a piece of cake to make. A slab of fondant or thin slice of cake supported by dowels can create the perfect path to your palatial pastry. Whatever you use, ensure it’s clearly cut and creatively connects with your cake.
Flag Festooning: Adding Pops of Color
Flags are more than frills; they’re the finishing touch that says, ‘Hey, check out this castle!’ Made with fondant or even paper, they bring in color that makes your edible edifice impossible to ignore. And here’s a fun tip – a sprinkling of edible glitter never did a regal flag any harm!
And don’t even worry about making everything military-grade stalwart – if a turret leans a bit like Pisa or a flag waves a tad too much like it’s in a hurricane, it only adds to the charm of your unique creation. In fact, you could even use this opportunity to check out how to make other delightful creations, perfect for the feast in the great hall after the castle’s reveal!
With all the key parts in place, it’s time to gear up for the grande finale: the final adornments. But before we get there, remember to let your imagination run wild – there’s no moat too wide or turret too high in the world of cake castles! Stay tuned to drape your castle in the royal regalia it deserves.
Capturing the Castle with Camera Craft
Alright, you wizards of whisk and wand, you’ve conjured up a castle cake that’s nothing short of spectacular. But hey, what’s the point if the world doesn’t see it, right? You know that in the realm of social media, if you didn’t post it, it didn’t happen. So, let’s get into the nitty-gritty of snapping the perfect pic of your culinary castle!
Lighting and Angles: Showing Off the Cake’s Best Side
Ever notice how in every fairytale, the magic happens when the light hits just right? Same goes for cake photography, folks. Natural lighting is your BFF, giving your cake that ‘Glow Up’ without a fancy schmancy filter. And angles? They’re like the knights guarding the towers – choose wisely, and your cake stands tall and proud. A good rule of thumb: try shooting at a 45-degree angle – it captures the layers and depths like a charm.
- Pro tip: golden hour equals golden shots – soft, diffused light can make your cake look dreamy!
Staging the Scene: Perfect Backdrops for the Perfect Cake
Now, a castle cake in all its splendor needs a worthy backdrop. Steer clear of kitchen clutter and go for something that screams ‘this is where the royal feast happens’. A clean, solid-colored cloth or a rustic wooden table can give your cake a regal stage to shine on. Oh, and remember, less is more – don’t steal the spotlight from your masterpiece with a busy background!
Got the shot? Awesome! But before you hit ‘share’, let’s sprinkle some final enchantment. A little edit here, a tweak there, and voilà – your cake’s ready for its digital debut. Apps like Lightroom and Snapseed are your fairy godmothers of editing. Crop, adjust brightness, add a touch of saturation, and boom – your castle cake is ready for the ‘Gram! And don’t forget those hashtags – #castlecake, #bakingbrilliance, #cakemagic, anyone?
| Step | Tip |
|---|---|
| Light | Use natural lighting for authenticity and warmth. |
| Angle | 45-degree angles can highlight the cake’s dimensions. |
| Backdrop | Keep it simple and let your cake take center stage. |
| Editing | Enhance but don’t overpower the natural beauty of your cake. |
“The only thing better than baking is showing off your baking!”
Remember folks, in the end, people eat with their eyes just as much as their mouths. So let’s ensure your cake creation looks as good online as it does on your plate. Now get out there, start snapping, and let’s see those confectionery castles crushing it on social!
Stay tuned, as we’re not done yet. We’ve still gotta tackle those common questions that pop up when you’re building your buttercream bastion – but that’s a story for another day.
FAQs about Making a Castle Cake
Alright folks, you’ve asked and I’m here to spill the royal icing on all things castle-cake conundrums. Yes, I’ve been there – covered in flour, icing bag in hand, and a turrets teetering on the brink of collapse. Let’s get those battlements back in shape, and maybe, just maybe, your cake can be the belle of the ball, or the bakery in this case.
Troubleshooting Turrets: When Things Don’t Stack Up
Ever felt like you’re building the Leaning Tower of Pisa instead of a fairytale castle? Fear not! When your turrets are acting tipsy, it’s usually a sign that your foundations need fortifying. Make sure your layers are as level as a knight’s table and don’t skimp on the support – dowels are your friends, folks. They’re the silent guardians of your gravity-defying grandeur.
Vegan Variations: Making Your Castle Cake Plant-Based
Yes, you can create a stronghold sans the eggs and dairy! Swap out those eggs for applesauce or flax eggs – magic tricks I’ve learned from the wizards of the plant-based realm. And for buttercream? Well, plant butters have come a long way, baby. Give ’em a whirl and watch your vegan castle rise with pride.
Storage Sorcery: Keeping Your Cake Majestic for Days
Because eating a whole castle in one sitting might be, well, an epic tale of stomachache and woe, you’ll wanna know how to keep your creation fresh. Here’s the magic spell: a cool, dark environment. Wrap it up snug as a bug in cling film, but don’t trap it in the fridge – that’s a moisture monster. Think cool pantry or bread bin, and that castle’ll be fit for a king even a few days on.
Remember, dear bakers, every castle cake is a unique beast, so expect a few hiccups on your journey to confectionery castle perfection. And hey, even if your drawbridge droops or your towers teeter, it’s all part of the charm. Just don a smile, wield your spatula with courage, and remember – in the land of cake, creativity is king (or queen!)
In closing, keep those questions coming – after all, we’re all part of the same knightly order of bakers, united in the quest for the perfect castle cake. Thanks for sticking with me, and may your frosting be forever sturdy!