
Selecting the Perfect Bananas
So, you’re ready to jump on the dehydrated banana chip bandwagon, huh? Well, strap in, ’cause picking the perfect bananas is more art than science. First off, you don’t want those mushy bananas that look like they’ve seen better days – no sirree! You’re aiming for that golden ticket: ripe yet firm. A little green around the edges won’t hurt; it’s like insurance that they won’t turn to goop halfway through.
The Ripeness Factor
Let’s talk ripeness. Don’t get swayed by those all-yellow charmers promising instant sweetness. Oh, they’re sweet alright, but too ripe means they’ll probably end up a dehydrated disaster. You want ’em just shy of their peak – think yellow with a dash of green like they’re blushing. That’s your cue for perfect texture post-dehydration.
Spotting Ideal Firmness
Now, firmness. You don’t want those bananas to have the consistency of a limp handshake; we need some backbone! Give ’em a gentle squeeze. If they hold their ground without feeling like a rock, bingo, you’ve got a winner. Soft spots are no-go zones, buddy. They’ll mess with your dehydration game.
Avoiding Overripe Pitfalls
And here’s a little insider tip: steer clear of the ones with brown spots or streaks. They might be sweet for a smoothie, but for chips? You might as well wave a white flag. Those overripe rascals will caramelize faster than you can say “banana,” and you’ll be left with a tray of chewy regrets.
Alright, so you’ve bagged the cream of the crop – what’s next on this crunchy adventure? Ah, the pre-treatment. But hey, that’s a story for another day (or, you know, the next section). Trust me, it’s where things get zesty! 😉
Pre-Treatment for Optimal Flavor
Alright, folks, let’s dive into the zesty world of pre-treatment for our soon-to-be dehydrated banana chips. Now, why bother with this step, you ask? Well, not only does a quick dip in some citrus juice add a delightful tang, but it also keeps your banana chips looking as bright and cheerful as a summer’s day.
Choosing Your Citrus Bath
Imagine this: you’ve got your perfect banana slices all lined up, and now it’s time to give them a little spa treatment. You can go classic with lemon juice, or get tropical with pineapple juice – either way, you’re infusing your snacks with a burst of flavor. Plus, that acidic zing helps prevent oxidation; that pesky process that turns your bananas a not-so-appealing brown.
- Lemon juice is a popular choice for its availability and bold flavor.
- Pineapple juice brings a sweeter, more nuanced zest to your chips.
Keeping the Blemishes at Bay
Let’s face it, nobody’s grabbing a bag of brown chips for snack time. So this pre-treatment step is crucial. After slicing your bananas, give ’em a quick dunk in your chosen juice to keep them from browning. It’s like sunscreen for your fruit, minus the coconut scent.
Infusing Taste with Pre-Treatment
But wait, there’s more! This isn’t just about looks. That citrus soak isn’t just a superficial face-lift; it’s seriously upping the taste ante. The result? Each crunchy bite is a harmonious blend of sweet banana goodness and a hint of sharp citrus – talk about a flavor profile!
Now, don’t get too caught up in the tantalizing tanginess of it all. Remember, balance is key just like when you’re making s’mores in an air fryer; too much and you might overwhelm the natural sweetness of the bananas. A quick dip is all you need – think of it as a toe-dip in the pool rather than a cannonball.
Once your banana slices are bathed and prepped, it’s time to talk thickness and technique, but hey, that’s a story for another day. Or, more accurately, the next section of our dehydrated banana escapade. So, keep those slices handy, and let’s gear up for slicing perfection!
Mastering the Slicing Technique
Alright folks, here’s the skinny on slicing bananas for dehydrating – it’s not rocket science, but there’s a method to the madness. You want uniformity, right? Well, that’s the golden ticket to ensuring your chips come out evenly dried, without some turning into banana jerky while others are still doing the backstroke in moisture city.
Achieving Uniformity
Now, when I talk about uniform slices, I’m preaching the gospel of consistency. Whip out that cutting board and imagine you’re a samurai of slices. You’re aiming for pieces that could pass as twins – about 1/4 inch thick or just a smidge more. Any thicker and you might as well grab a book while you babysit the dehydrator. Too thin? And they’ll disappear faster than my motivation on a Monday morning.
Tools for the Perfect Slice
So, what’s your weapon of choice? A sharp knife is a go-to, but for those who wanna up their game, a mandoline slicer is the secret handshake of pro snack makers. It’s like having a cheat code for perfect thickness, and you’ll be churning out chip-ready slices faster than you can say ‘banana bonanza.’
The Impact of Thickness on Drying Time
So why fuss over thickness? Here’s the deal: uneven slices are the troublemakers of drying times. Some will be ready to vacate the dehydrator while their thicker buddies need more spa time. The last thing you want is a mixed bag of textures. Consistent thickness means they all get to the finish line together, and that, my friends, is the slice of heaven we’re after.
And hey, once you’ve got those perfect slices laid out, you’re ready to tango with the Art of Arranging on Trays. It’s a bit like Tetris, but with banana slices – and oh boy, is it satisfying.
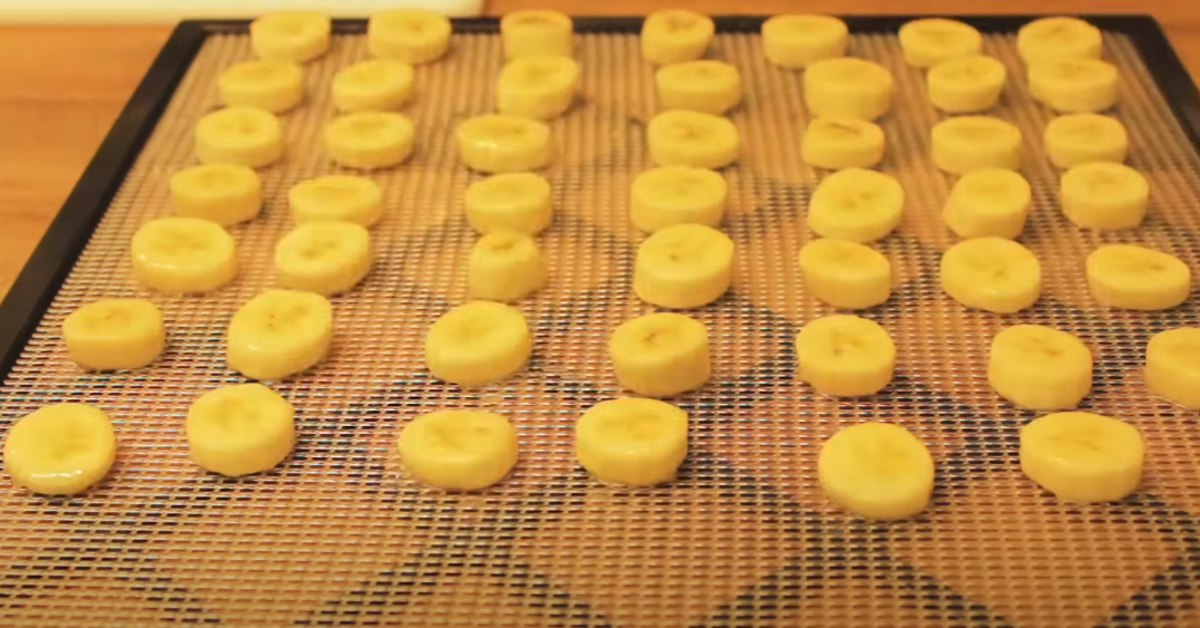
The Art of Arranging on Trays
Once you’ve got those bananas sliced to golden perfection, it’s time to play a little game I like to call ‘Banana Tetris’. But seriously folks, arranging your banana slices on the dehydration trays is a step you don’t wanna gloss over. It’s like setting up dominoes; you’ve gotta get them all lined up just right to make the magic happen.
Spacing for Circulation
First off, we’re talkin’ about space – and not the final frontier, even if your kitchen feels like a spaceship with all these gadgets. Lay down those banana slices and make sure each one’s got its own personal bubble. This isn’t a crowded elevator; we need room to breathe—or in this case, dehydrate. Why, you ask? Airflow, my friends. Airflow is the unsung hero that’ll turn that soft, chewy banana slice into a crisp, snappy chip.
Tray Arrangement Strategies
Here’s a hot tip: think of your dehydrator tray as a clock. Start placing slices at 12 o’clock and work your way around. This way, you’ll avoid overcrowding and ensure each slice gets an equal tan under that dehydrator sun. And don’t go layering those slices; we’re not making a banana lasagna!
Maximizing Your Dehydrator’s Space
Got a big bunch of bananas? No problemo. You can maximize your dehydrator’s real estate by using mesh inserts for smaller pieces and stacking trays efficiently. But remember, we’re not stuffing a turkey here; we still need that space we talked about.
So, once you’ve got those banana slices lounging on the tray like they’re sunbathing in the tropics, it’s time to move on to the nitty-gritty of dehydrator settings and timings. But that’s a chat for another time. For now, just know that proper tray arrangement is the secret handshake to dehydrating success.
Dehydrator Settings and Timings
Ah, the subtleties of dehydration! If you want your banana chips to have that je ne sais quoi, paying attention to the knobs and buttons on your dehydrator is a must. That’s right, I’m lookin’ at you, wary kitchenmate—it ain’t rocket science, but it sure is a game-changer!
First things first, Temperature Precision. Your dehydrator’s as sensitive as my Aunt Rita at a rom-com flick—too hot and you’ll zap away all the nectarous flavors, too cool and you’ll have yourself a banana leathers, not chips. What’s the golden rule? Aim for a cozy 135°F (57°C). Like a sunny with a chance of flavorful, if you catch my drift. 🌞
Now, let’s chat Timing Your Batch Right. Look, unless you got a time machine hidden under that apron, you’ll need to play it by ear—or in this case, by peel. Starting off, set a timer for 6-8 hours, but keep your peepers peeled for that ‘chip nirvana’. 👀 Overcooked banana chips are simpatico with coal, and honey, nobody’s here for a crunch that ends in a wince.
- Pro tip: Lean in close, and let me tell you a secret. Set that first timer for the lower end of the range, and then check on your little golden treasures. We’re aiming for that loud crunch without turning ’em into banana fossils.
Moving along to Dealing with Variance in Dehydrator Models. Not all dehydrators are created equal—some are like that overachiever in highschool while others are more like me trying to get to the gym; they mean well, but just don’t cut it. Keep an eye on your model’s manual, and if you’ve tossed it like last year’s tax returns, fear not! A quick online search and you’re golden.
Remember folks, these banana chips ain’t gonna watch themselves. At the end of the day, your diligence and knack for twiddling those dials is what stands between success and banana bread fodder. Next up, we’re going to buckle up for the Patience of Proper Drying. So stay tuned, don’t wander off, and keep that spatula at the ready—because this ride ain’t over yet!
The Patience of Proper Drying
Let’s talk about patience, my friend – it’s not just a virtue; it’s your number one ally in the quest for deliciously crunchy banana chips. You can’t rush perfection, right? And when we’re turning those perfectly sliced banan-o’s into gold, keeping an eye on the drying process is like watching over a culinary symphony!
Now, here’s the lowdown: Regular checks are your best bet to avoid the dreaded banana brick or, on the flipside, the mushy flop. I’m talking about that sweet spot where they’re not too chewy and not too crispy. It’s like going for gold in the Banana Olympics – you want that podium finish for taste and texture!
Checking for Dryness
- Set a timer, folks – your nose isn’t going to help you here. Keep peeking in on those banana babies every so often. Look for a lack of sheen – that means they’re just about done.
- Feeling is believing – give ’em a little poke. They should have a slight flex but snap when bent. That’s the crunch we’re after!
Avoiding the Snags of Over-drying
- If they start resembling those banana chips from the back of your pantry that could double as lethal frisbees, you’ve gone too far.
- Remember, they’ll firm up a bit after cooling down, so if they seem a smidge bendy, they might just be ready.
Recognizing the Signs of Perfect Dehydration
Ah, the glory of nailing the drying time! The edges will be a crispy brown, like the edges of a sun-kissed beach in banana bread paradise – minus the overripe, soggy banana slices that didn’t make the cut.
Listen, don’t be the Icarus of the dehydrating world. A tad too much heat, a smidge too long in the dehydrator, and poof – ambition turns to ash… or rather, blackened banana bits.
So just as you wouldn’t leave a soufflé to fate, don’t abandon your future snacks. Keep a watchful eye, my fellow snacker, because it’s almost time to pivot to the next crucial phase – storing these treasures properly. But let’s not jump ahead. Ensure your chips are moisture-free and cool to the touch, then – and only then – will it be time to talk containers. Cool? Cool.
Storing Your Banana Chips
So, you’ve danced around your kitchen while those banana slices turned into gorgeous, golden chips right before your eyes—congrats! You’re nearly at the finish line, my friend. But whoa there, Nelly! Don’t go munching on your entire batch just yet. We gotta talk storage because, let’s face it, nobody likes a soggy banana chip. 🍌💔
Tips for Long-Term Freshness
- Air circulation: Banish any remaining moisture by cooling your chips on a rack before the big lockdown into containers—trust me, it’s a game changer!
- Keep ’em sealed: Airtight containers are your best buds. Less air equals less chance for moisture to sneak back and ruin the party.
- Avoid the squish: Gently stack your chips. Squashing them is a no-go unless you’re aiming for banana powder (you do you).
Avoiding Moisture’s Mess
You know that icky feeling when you’re all set to enjoy something crunchy and it gives you that chewy ‘eww’ vibe instead? Yep, we’ve all been there. Moisture is the arch-nemesis of crunchiness. Quick fix tip? Those tiny desiccant packets you find in shoe boxes—plonk one in your storage jar. Boom, moisture be gone!
“Keep your friends close, and your banana chips closer.” 😂 In an airtight container, of course!
Now that you’re practically a PhD in banana chip preservation, just remember to check on them once in a blue moon, like that forgotten jar of pickles at the back of your fridge. You want to catch any condensation early, lest it turn your crispy treasures into chewy disappointments. 😞
Selecting Ideal Containers
Not all containers are created equal, folks. Glass jars with airtight seals? *Chef’s kiss*. Plastic containers with a good seal? Works too. But avoid those flimsy takeaway containers. Stick with the solid stuff, ’cause those chips deserve a mansion, not a tent.
Now if you’re thinking “But what next?” Well, you’ll be diving into the FAQs: All Things Banana Chip Dehydration—where the juicy secrets and top tips live. So, hang on to your hat, ’cause the ride ain’t over yet!
FAQs: All Things Banana Chip Dehydration
Alright, folks, let’s dive into the nitty-gritty of banana chip dehydration – it’s not rocket science, but we’ve got some burning questions that need answers. I can almost hear ya say, “Hit me with that dehydrated banana wisdom!” So here goes nothing:
Ideal Banana Varieties for Dehydrating
So you’re standing in the produce section, eyes glazed over, wondering which type of banana will morph into those irresistible chips? I’ll save ya the headache: Go for the Cavendish – they’re your garden-variety supermarket bananas. Sweet, easily available, and they dehydrate like a dream. But hey, if you’re feeling adventurous, why not try a plantain? It’s the banana’s starchier cousin and can add a unique twist to your snack game.
Solving Common Dehydration Conundrums
Picture this: You’ve followed all the steps, and yet your banana chips are stickier than a political debate! Fear not, my snack-deprived friend – this could be a sign of under-drying. Simply pop them back in the dehydrator for a bit longer and keep an eye on them, just like you’d babysit a toddler with a new box of crayons and an interest in wall art.
Flavor-Enhancing Secrets Revealed
Y’know how a little sprinkle of salt can turn a meh tomato into the belle of the ball? It’s the same with banana chips. Before you dehydrate, consider dusting your banana slices with cinnamon, nutmeg, or heck, even some chili powder if you’re feeling saucy. It’ll give your chips that chef’s kiss of flavor!
- Wait, does size matter?
You bet it does – in the world of banana chips, at least. Thicker slices mean longer drying times, but too thin and they’ll turn into banana wisps. Aim for that Goldilocks zone! - Any tip-offs for perfect storage?
Airtight containers are your BFFs! Keep those chips away from moisture like it’s the last piece of chocolate cake at a birthday party.
So there ya have it, chip champs. Whether you’re a dehydrating rookie or a seasoned pro, these tips should help you avoid slip-ups and become the banana chip whisperer you were always meant to be. Now go forth and dehydrate with confidence!
In closing, I want to thank y’all for tuning in to my banana chip saga. May your snacks always be crunchy, and your dehydrator never falter. Bid farewell until next time – keep it crispy, people! 🍌✌️