
Choosing Your Ingredients: The Foundation
Ever been to a bake sale and spotted that one soccer ball cake that made you think, “Whoa, how’d they do that?” Well folks, strap on your apron because we’re about to dive into the world of spherical cake magic. Let’s kick it off with the basics – ingredients. They’re like your football team; you need the right players to score that goal!
Selecting the Right Cake Mix: Flavor Matters
Alright, team, here’s the scoop. When you’re picking your cake mix, think about the crowd you’re serving. Are they classic vanilla fans or do they like to walk on the wild side with red velvet? Remember, flavor ain’t just a suggestion – it’s the MVP of your cake game!
- Vanilla or Chocolate – Can’t go wrong with these all-stars.
- Red Velvet – For those who like a little flair.
- Funky Flavors – Don’t be shy! Try out that salted caramel or mocha mix.
And hey, why not mix it up? A layer of chocolate with a cheeky vanilla center might just get you that standing ovation.
Freshness Counts: Picking the Best Eggs and Dairy
When it comes to eggs and dairy, fresher is better. It’s like comparing a just-outta-bed soccer pro to one that’s been snoozing on the bench – you want the one that’s ready to play! Crack those eggs with confidence and make sure your milk and butter haven’t been hanging around longer than that leftover pizza in your fridge.
- Eggs – Check the date and do the float test. If it sinks, it’s game time.
- Butter – The fresher, the creamier. Nobody wants a stale-tasting cake!
- Milk – Sniff test, folks. If it smells like it’s been on a week-long bus trip, toss it.
Remember, these ingredients are what give your cake that fluffy, moist texture we all crave.
Sweet Decorations: Types of Frosting and Food Coloring
Now, don’t get me started on frosting. It’s like choosing the right jersey for your team – it’s gotta look sharp and taste even better. Are you thinking buttercream, or is cream cheese more your jam? Go wild with colors but keep it tastier than a halftime orange slice, alright?
- Buttercream – Silky smooth and ready to spread.
- Cream Cheese – A tangy twist that’ll have ’em coming back for more.
- Food Coloring – Those soccer ball patterns won’t make themselves. Get bold with those colors!
And just a nugget of wisdom: gel food coloring packs more punch than the liquid stuff – it’s like the difference between a rookie and a pro player.
Alrighty, now that we’ve got our all-star lineup, let’s move on to the kitchen battlefield. Next up, we’re talkin’ tools – the real secret to baking a showstopper. Stay tuned!
Equip Your Kitchen: Essential Tools
Alright, folks – before we dive into the nitty-gritty of baking that show-stopping soccer ball cake, let’s talk shop. I mean, you wouldn’t build a house without a hammer and nails, right? So, why would you bake a cake without the proper tools? Let’s gear up!
Baking the Base: Spherical Cake Pans
First things first, you’re gonna need a spherical cake pan. Yes, they exist, and yes, they are a game-changer! Now, before you say it, I know what you’re thinking: “Can’t I just carve it out of a regular cake?” Sure, if you fancy yourself a bit of a Michelangelo, but trust me, these pans will save you a truckload of time and give you that perfect soccer ball shape. They’re like the striker on your baking team – absolutely essential.
Precision is Key: Measuring Cups and Scales
Next up, precision instruments: we’re talking measuring cups and kitchen scales. Sure, you can wing it, but do you really want to risk your cake being denser than a black hole? I thought not. Get yourself some measuring cups for liquids and dry goods, and a digital scale for that ‘chef’s kiss’ accuracy.
Icing Perfection: Spatulas and Piping Bags
Now, onto the icing – the real MVP. It’s all about the spatulas and piping bags, baby! A good offset spatula will smooth your icing out faster than you can say “buttercream,” and piping bags with a variety of tips will give you those crisp soccer ball lines that’ll have guests doing a double-take.
Remember, whether you’re a seasoned pro or a baking newbie, having the right tools will make your cake a league above the rest. And hey, speaking of leagues, did you know that you can make s’mores in your air fryer? Yep, it’s possible, and they’re the perfect snack for watching the big game after you’ve scored a goal with your cake.
So, with your kitchen now kitted out like a pro, let’s move on to the next step, shall we? The art of crafting the perfect sphere is up next, and trust me, it’s going to be a ball!
Crafting the Perfect Sphere: Cake Preparation
Alright, folks, let’s dive into the nitty-gritty of turning that gooey batter into a soccer ball worthy of the World Cup of Cakes. First things first – mixing matters. Now, you might think, “It’s just mixing; how hard can it be?” Oh, but my friend, this is where the magic begins! The goal? A batter smoother than a jazz solo. You gotta beat it like it owes you money, but gently, like you’re massaging a kitten. Make sure there are no lumps, unless you want your soccer ball to look like it’s seen better days.
Oven Alchemy: Baking Time and Temperatures
Moving on to the oven alchemy. I mean, we’re pretty much cake wizards here. The baking time and temperature are like the secret spell for perfection. Too hot and your sphere will be more like a pancake; too cool and you’ll be watching it rise till the next soccer season. Aim for that sweet spot – usually around 350°F (because we’re not trying to roast a turkey here) and keep an eye out for the top to turn golden like the morning sun.
Cooling Strategies: Ensuring Structural Integrity
And here’s a tip – don’t rush the cooling process, patience is a virtue! Yank that cake out too soon, and you risk it collapsing faster than a house of cards. Let it sit in the pan for a bit, then transfer it to a wire rack. Think of it like it’s sunbathing on a lounge chair, just chilling.
Now, we’ve got our cake baked and cooled, but we’re not stopping there. Oh no, we’re just getting warmed up! Next up, we’re about to tackle the Sculpting the Soccer Pattern: Icing Techniques. So grab your spatulas, folks, ’cause it’s about to get frosty!
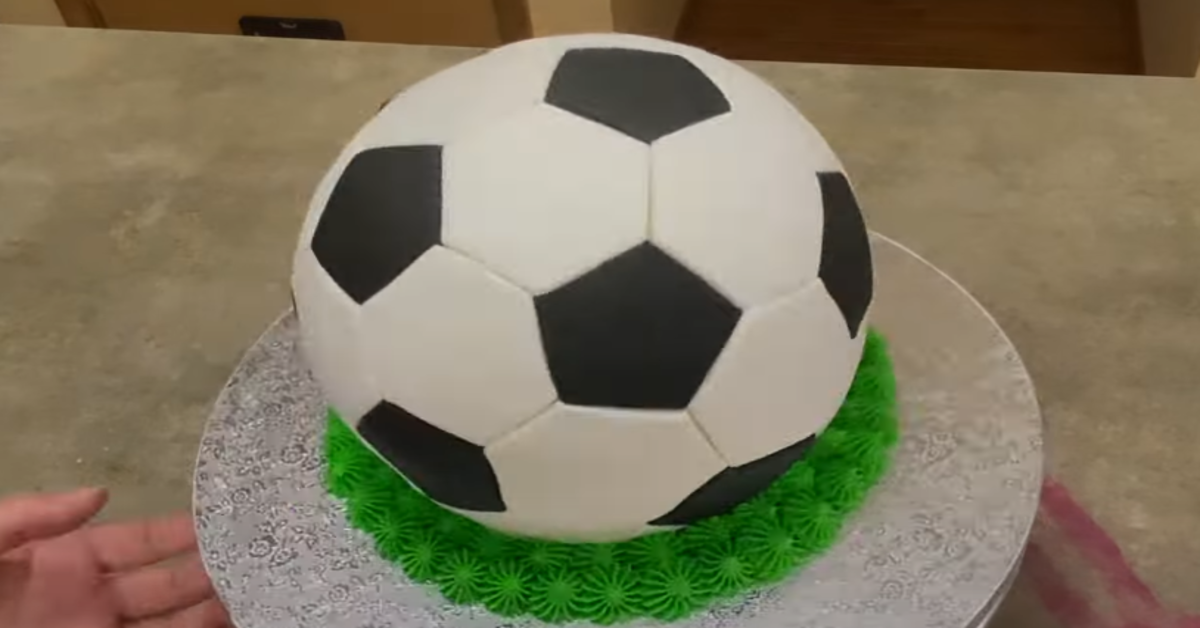
Sculpting the Soccer Pattern: Icing Techniques
So, you’ve baked your spherical marvel and it’s cooled off, huh? Great! Now, let’s roll up our sleeves and dive into the really fun part – turning that tantalizing orb into a monochrome masterpiece. Trust me, with a steady hand and some patience, you’ll be icing like the pros in no time!
Outlining the Pentagons: A Guide to Symmetry
First things first, grab an image of a soccer ball. Nope, not to kick around – we’ll need it as our blueprint. Ready? Okay!
- Sketch gentle pentagons on the cake with a toothpick. Remember, it’s all about the symmetry, so take your time.
- Once you’re happy with the layout, it’s time to pipe on those lines. Use black icing and a fine-tip to keep it neat.
Smooth Finesse: Spreading Evenly
Ever tried to spread icing and ended up with more on your fingers than the cake? No worries – we’ve all been there. The trick is to plop a generous dollop of white frosting in the center and gently work your way outwards with an offset spatula. Keep it smooth and even, like you’re caressing the cake, not battling it!
Contrast and Contours: Balancing White and Black Icing
Once the pentagons are piped, fill ‘em in with black icing – don’t be shy, give it a good fill. But hey, leave some room for that white to pop! The contrast is what’s gonna bring this soccer ball to life. And if you want to know about getting things to blend without the proper equipment, you’ve got to check out this trick for smoothies.
Remember, folks: when you’re icing, it’s all about balance and patience. Too much black and things will look muddy, too little and your ball will look like it’s seen better days. Aim for that sweet spot where the white and black icing sing in harmony.
Alrighty, now that the ball’s pattern is on point, let’s move on to the next step. You’re about to add some pizzazz that’ll make your soccer ball cake not only look amazing but become the center of the conversation. Keep those spatulas at the ready, we’re about to kick things up a notch!
Adding Depth to Details: Decorating Tips
Alrighty folks, let’s dive into the nitty-gritty of turning that plain ol’ spherical cake into a legit soccer ball masterpiece. And I mean, we want this thing to look so real that someone might just give it a kick by accident. 😅
Fine Lines: Using Edible Markers
Now, have you ever seen those cakes where the details are so sharp you’d swear it was done by a laser? That, my friends, is the magic of edible markers. These little wonders are primo for adding those intricate designs. Pro Tip: When drawing your lines, keep a steady hand and let your creativity be the referee! 🖊️
Touch of Gloss: When to Apply Edible Glaze
Moving on, if you wanna give your cake that shiny, fresh-out-the-box soccer ball sheen, you gotta use some edible glaze. Picture it: your cake, so glossy, it’s practically winking at you. But timing’s everything, folks. Slap that glaze on after the icing has set; otherwise, you’re gonna end up with a gooey mess, and nobody’s got time for that!
Grass Effects: Crafting a Pitch-like Base
Last but not least, let’s talk turf. If you want your soccer ball cake to look right at home, you gotta nestle it on a sugary pitch. Grab some green frosting and a grass tip for your piping bag. Go on, pipe away to create that grassy knoll your cakeball dreams of. The whole ‘playing field’ vibe? It’ll have your guests red-carding their diets just to get a taste!
Alrighty, it’s time to transition smoother than a soccer player on game day into our next topic. So, lace up your baking boots, we’re headed into Preserving Your Masterpiece: Storage Hacks. You’ve built the cake stadium; let’s make sure it stays fresh for the big game day.
Preserving Your Masterpiece: Storage Hacks
So you’ve just put the final touches on your spherical showstopper, and you’re probably thinking, “How in the world do I keep this soccer ball cake looking like it’s ready for the World Cup until game time?” Fear not, fellow bakers, for I’ve got some primo tips that’ll guard your edible piece of art faster than a goalie on a caffeine buzz!
Protection from Elements: Covering Techniques
First things first, let’s talk defense against air, which is just about as sneaky as a striker in offside position when it comes to drying out cakes. Slip your cake into a cake carrier, or swaddle it gently with plastic wrap. Now, if your frosting is the MVP here, you’ll wanna use toothpicks to create a small tent over the cake before wrapping. This way, you’re not smudging the icing. Clever, huh?
Conserving Freshness: Optimal Temperature Settings
Next up, we’ve gotta keep that cake fresh – like, “just out of the oven at halftime” fresh. The fridge is your pal, but it can also be a flavor-sapping fiend if you’re not careful. Keep the temperature steady – not too cold, or you’ll turn your cake into a deflated soccer ball. Refrigerate it for short-term storage. But hey, if you’re looking ahead of the current play and planning on keeping your cake longer, check out the article on freezing your sweets for the best tricks on preserving it in a freezer. Just remember to wrap it up tight!
Transport Tricks: Moving Your Cake Safely
Last on our list but definitely not least, transporting your cake can feel like a tense penalty shootout. To make sure your cake doesn’t fumble on the way to the party, place it on a non-slip surface inside a box. Hold that box steady – think of it as hugging the midfield, maintaining control so nothing gets past you. And take those turns nice and easy, just like you’re cornering the field.
There you have it, folks: keep your cake wrapped, refrigerate or freeze with care, and transport like a pro. Now, let’s move onto cutting this beauty – oh, and don’t worry, we’re not actually going to kick it!
Serve in Style: Presentation and Cutting
Alright, my fellow home chefs and aspiring cake artists! You’ve just sculpted the perfect sphere of a soccer ball cake – and believe me, that’s no small feat. Now, let’s kick it up a notch with some presentation flair that’ll have your guests chanting your name. ⚽🎂
Choosing Serving Platters
First off, ya gotta pick the right stage for your cake. Think big, bold, and beautiful. A sleek, white platter? Oh, it’s a classic – like a pristine soccer pitch just begging for the match to start. But do you want to get a bit crafty? Try a green mat or a custom-designed platter that resembles a soccer field. And hey, if you’re feeling cheeky, slap a team logo on that bad boy. Just don’t forget to make sure it’s big enough for your creation!
Cutting Equal Portions
Now, cutting the cake can be trickier than scoring a goal in the World Cup finals. You want to be fair, right? Even slices for everyone. And I ain’t just whistlin’ Dixie here – a cake divider can save you a heap of trouble. Or, get this, use a piece of string to mark out your slices before making the cut. That way, everyone gets an equal share of the glory.
Pairing with Beverages
Let’s talk drinks, folks. You’d think cake goes with anything, and you’re not wrong, but some pairings are top league. A nice cuppa joe? Perfect for the adults enjoying the game. For the kiddos, how about a frothy mug of root beer or a cool glass of milk? Oh, and for those sweltering summer soccer parties, an ice-cold lemonade will make your cake sing – figuratively speaking, of course!
Now, before you dash off to serve that piece of edible art, remember, the taste is just as important as the looks. So, make sure your cake has had time to rest, and the flavors have melded together – kind of like a well-seasoned soccer team. And there you have it, you’re all set!
Oh, and if you’re fretting over which layer of the cake to cut first, always go top to bottom, my friend. It keeps the balance, and you won’t end up with cake landslide. Disaster averted! Now, keep your eyes peeled for the next section, where we will tackle those sticky storage hacks for preserving that MVP of a cake. You got this!
FAQs: Your Soccer Ball Cake Queries Answered
Alright, team, let’s huddle up and tackle some of those head-scratchers you’ve been sending my way about making a soccer ball cake that’ll have your party guests kicking their heels up in joy! 😉
“How do I prevent the cake from crumbling when I shape it?”
Lemme tell ya, patience is not just a virtue; it’s a necessity. Make sure your cake has fully cooled down before you even think about shaping it. A crumbly cake is like a soccer ball with a bad attitude—it just won’t play ball! If you’re still getting crumbs, try popping the cake in the fridge for a smidge to firm up. Works like a charm!
“Can I make this gluten-free or vegan?”
Of course! It’s 2023, and the world’s your oyster mushroom—gluten-free and plant-based options are everywhere. Just make sure your subsitutes are equivalent in moisture and binding properties, or you might end up with a soccer ball that deflates faster than you can say ‘goal!’ And nobody wants that, right? 🌱
“How far in advance can I assemble the cake?”
Look, making a masterpiece takes time, but don’t get ahead of the game. A day or two in advance is your sweet spot; enough time to let flavors meld but not so long that your cake gets a chance to dry out and score an own goal on taste. Keep it covered in a cool, dry place, and you’re golden!
Like a true soccer champ, you’ve got to be prepared for the unexpected—a sudden rain shower or a last-minute substitution—so keep these tips in your back pocket, and you’ll be scoring culinary goals in no time. Thanks for joining me on the pitch; I hope your soccer ball cake turns out to be the league’s MVP (Most Valuable Pastry)! 🍰 ⚽
Until next time, keep your spirits up and your oven hot!