
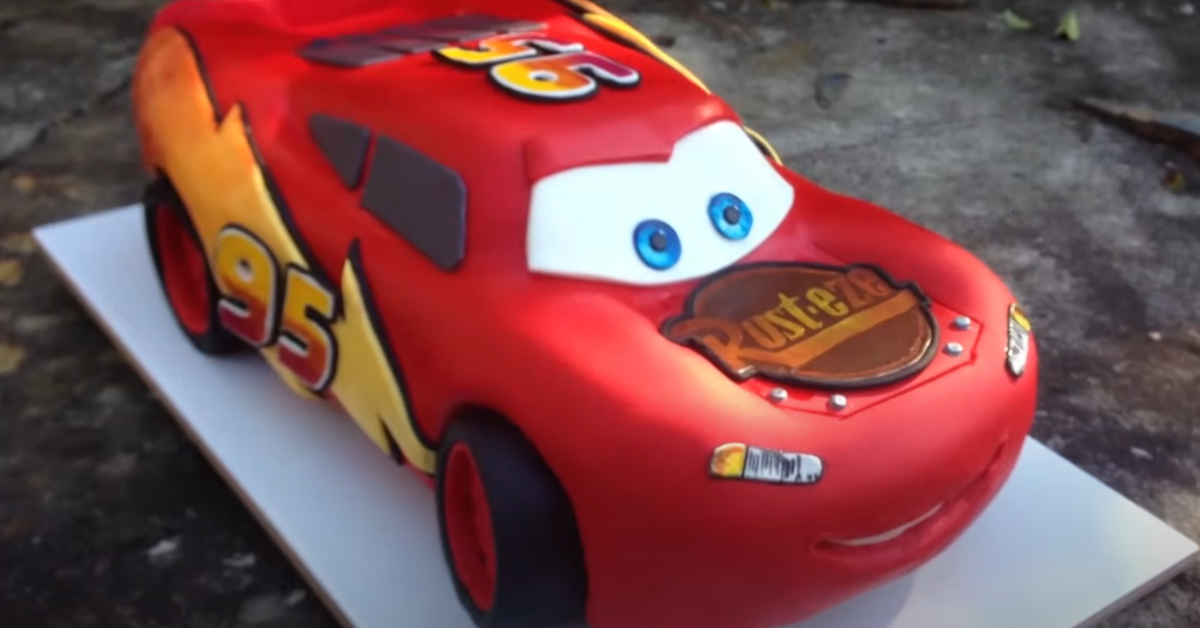
Alright folks, buckle up because we’re about to zoom into the world of car cake design, where the only crashes happening are the sugar highs after gobbling up your masterpiece. Choosing the blueprint for your roadster cake is kind of like selecting your fantasy car – but instead of horsepower, we’re looking for eye-popping, jaw-dropping, and taste bud-awakening details!
Scale and Complexity: Sports Car or Family Sedan?
First up, what’s it gonna be? A sleek, low-slung sports car with curves that would make a racetrack blush, or a sensible family sedan that screams “I’ve got cup holders”? Think about your baking skill level, my friends. A simple sedan might not turn heads, but it’s a solid choice for beginners, while that sports car might need skills that rival a Le Cordon Bleu grad. Decide on the complexity you can handle without needing a pit stop for a nervous breakdown.
Visual Guides: The Importance of Reference Images
Don’t wing it, unless you’re crafting a cake with wings – which, hey, I’m not judging. Grab those reference images! Having a photo or three will ensure your cake ends up looking like a Mustang, not a mustang (the horse, folks). So hit the web, swipe through some car mags, or sneak a peek at your neighbor’s driveway – whatever it takes to get those visuals.
Template Creation: Crafting the Perfect Cut-Out
You wouldn’t build a house without blueprints, and the same goes for our car cake. Channel your inner architect and create a paper template. It’s one part arts and crafts, one part surgical precision. Get your scissors ready to snip your way to a cake that looks less like it’s melting and more like it’s motoring.
Now, we’re shifting gears and heading straight into assembling our pit crew essentials. You wouldn’t hit the road without checking your engine, and we’re not starting our cake without checking we’ve got all the right gear. So stay tuned, ’cause next up, we’re gonna talk about the tools of the trade and the secret ingredients that’ll make your cake the talk of the town. 🍰🚗
Assembling the Pit Crew Essentials
Alright, gearheads and sugar rush enthusiasts, it’s time to align our baking tools like we’re preparing for the ultimate pit stop. You wouldn’t expect a mechanic to fix a carburetor with a toothpick, right? So why should we bake a show-stopping car cake without the right equipment? Let’s roll up our sleeves and lay out the essential tools: those trusty mixers, a fleet of pans, and spatulas ready to swipe with precision.
Key Ingredients: Flavors that Fuel the Experience
- Now, don’t just grab any ol’ bag of flour from the shelf. We need the high-performance stuff, ’cause this isn’t your grandma’s pound cake we’re assembling—it’s a premium, high-octane delight. And let’s talk about flavors – they’re the nitrous oxide of our culinary car. Vanilla essence? Check. Almond extract? Ooh, you betcha. This is where we go full throttle on the taste buds.
Decoration Details: Fondant vs. Frosting Showdown
Oh, and the age-old question: to fondant or not to fondant? Some say it’s like choosing between leather and cloth seats. Fondant gives you that sleek, polished look, but buttercream frosting? That’s the comfort classic with a taste that’ll make you feel like you’re cruisin’ down memory lane. Whichever team you’re on, make sure it’s ready to lap the competition.
As we’re scouting the aisles for the key ingredients, remember, each flavor is a pit stop on this race track of deliciousness. Get creative! This car cake is your Indy 500, and you’re in the driver’s seat.
Now, I can see you itching to start your engines, but hold your horsepower—we’re heading into the next leg of this race. Next up, we’ll talk engine-revving batter preparation, where we’ll get down to brass tacks on mixing a no-lump beauty that could make a grown man cry with joy. Stay tuned, buckle up, and let’s get ready to pour some heart and soul into this cake mix!
Engine-Revving Batter Preparation
Alright folks, strap in because we’re about to kick the flavor into overdrive with some serious batter prep. Imagine you’re in the pit, the crowd’s going wild, and you’re the hotshot getting ready to mix up something that’ll have ’em all drooling. Now, let’s get down to the nitty-gritty and talk turkey—or should I say, cake?
The Perfect Mix: Whisking up a no-lump batter
First things first, we gotta make sure our batter is smoother than a greased axle. Toss those lumps to the curb by whisking like there’s no tomorrow. But remember, it’s a cake mix, not a race—so keep it steady and just fast enough to get the air in, which makes for a fluffier ride. Don’t be shy with that whisk; let’s make some magic!
Flavor Pit Stops: Injecting tastes that tantalize
Now, before you put the pedal to the metal, let’s talk flavors. Are we going classic vanilla, or are we daring to swerve into chocolate territory? Maybe even a zesty lemon to add some zing to the mix? Whatever your taste buds are screaming for, listen to ’em and add those extracts or zest with a daring flick of the wrist. After all, the right flavor can take your cake from zero to hero faster than a dragster!
Consistency Counts: Achieving the ideal pour
And here’s the kicker: consistency. Too thick and you’re looking at a cake denser than morning traffic; too runny and well, you’ve got a cake puddle on your hands. Aim for the sweet spot, where the batter falls off the spatula in a graceful ribbon, ready to settle into the pan smoothly. It’s all about finding that perfect balance, just like tuning an engine for race day.
With the batter ready to roll, it’s almost time to send it to the oven for baking. But don’t just drop the mic yet—we’re moving on to Baking Your Chassis to Perfection, where the real heat begins. So keep your oven mitts close and your anticipation closer, ’cause this cake’s journey to greatness is just heating up! 🍰🏁
Baking Your Chassis to Perfection
Alright, gearheads and cake enthusiasts, we’ve mixed our batter with the precision of a NASCAR pit crew, and now it’s time to bake this beauty. So, let’s preheat those ovens and ready our pans—because our cake chassis is hitting the heat!
Timing the Lap
Just like in racing, timing is everything. You wouldn’t pull into the pit stop too early, and you certainly can’t yank that cake out of the oven prematurely. Set your timer to the recipe’s sweet spot, and while you’re at it, why not peek at some delicious vegan pandan cookies—they might just be your next baking project!
Oven Hotspots
Ever noticed how some folks like the inside track, while others prefer the high line? Ovens have their preferences, too. Hotspots can turn your cake into a one-sided char fest, so give it a gentle spin halfway through—just like a perfectly executed drift.
Cooling Down
Patience, my friend, is not just a virtue; it’s a necessity. After the checkered flag has waved, and your cake is baked to golden perfection, it’s tempting to dive right into sculpting. But hold your horses! Let that cake cool down completely—a warm cake is more Vin Diesel in “A Man Apart” than “Fast & Furious.” 😆
Now, as your cake is chilling like a car in the victory lane, you can start gathering your sculpting tools. Because up next, we’re shaping our speedster into a confectionery wonder that would make any car lover or sweet tooth swoon.
Sculpting Your Speedster
So, you’ve patiently waited out the cooldown and now you’ve got a cake cooler than an ice cream truck’s playlist on a hot summer day 🍦. It’s time to shift gears and start sculpting! You didn’t think we were just gonna slap on some icing and call it a “car cake,” did ya? Heck no! We’re crafting a masterpiece worthy of a Concours d’Elegance.
Trimming Techniques
Grab your serrated knife and start carving. Imagine you’re a pit crew boss shaving seconds off a lap time, ’cause here, we’re shaving off cake edges. You’ve gotta work with the precision of a Swiss watchmaker, ensuring every swoop and curve mirrors your blueprint. No room for mulligans here!
- Angle the knife: and cut away parts with the finesse of a skilled barber, keeping your eye on the symmetry.
- Save the scraps: thye can come to the rescue for any uh-ohs or if you need extra “bondo” later.
Fine Tuning
Alright, Picasso – it’s smoothing time. Swap the serrated knife for a small spatula and channel your inner Michelangelo. Gently go over those chopped-up bits to achieve that aerodynamic smoothness every supercar would envy. After all, you want your cake to look fast even when it’s parked on the dessert table, right?
Bondo for Bakers
You know that little gap in the bodywork after a particularly enthusiastic trimming session? That’s where your cake scraps and a dollop of frosting come in handy. Mix ’em together and plaster over the potholes; you’re aiming for that seamless bodywork look.
Let’s be real: sometimes our cake carving enthusiasm can make a NASCAR pit stop look slow. So if you’ve got divots big enough to store spare change, this tip is a lifesaver. The bondo’s not just for show; it’ll give you a smooth surface for the fondant freeway we’re heading onto next! And remember, just like race day, the devil is in the details—so take your time and handle with care.
With our cake now looking more hot rod than hot mess, our next pit stop is all about getting flashy. We’re gonna dive into the world of frosting and fondant, ’cause it’s time to add some color to our creation 🏎️💨. But that’s a story for another slice—stay tuned!
Shifting Gears with Frosting and Fondant
Alright, my fellow baking aficionados, it’s about that time we shift gears and get our hands sticky with some good ol’ frosting and fondant. You’ve got your cake looking like a sweet ride; now let’s give it the dazzle it deserves!
Frosting the Foundation
Before we even think about fondant, we need a solid layer of frosting. Think of it like the primer before a paint job—it’s essential. Now, you’re gonna slather on that frosting smoother than a hot knife through butter. Remember, it’s all about creating a perfectly adhesive surface for our fondant to stick to. Plus, who doesn’t love an extra layer of sugary goodness?
- Pro Tip: Crumb coat first, pals! This thin layer of frosting’s gonna catch all those pesky crumbs and keep ’em from mucking up our fondant.
Fondant Handling
Here’s where things get a tad tricky, but stay with me—we’re in this together! Unleash that fondant onto a surface dusted with powdered sugar, and roll it out faster than you can say ‘Pit stop!’.
Once you’ve got that fondant rolled out, gently drape it over your cake. Smooth it out, starting from the top, working your way down those sexy curves of your car-cake-to-be. Wanna avoid a fondant faux pas? Keep those edges sharp and sleek, just like a real sports car.
- Keep it Cool: Fondant’s fickle, folks. Keep it cool and work fast to avoid any sticky situations.
Decor Accents
This is where your cake starts vrooming to life!
Those tiny leftover bits from last night’s French fries can be reborn as side mirrors, and oh, are those gum-paste spoilers we see coming together? Heck yeah, they are! Get creative with these bits and bobs—it’s all in the details.
- Time for piping! Those racing stripes aren’t going to pipe themselves. Squeeze out steady lines and watch as your car cake races ahead in style.
- Don’t forget the bling—shiny luster dust can give your rims that fresh-off-the-track look.
But don’t slam the brakes just yet! Up next, we’re diving into those piddly bits that make our taste buds do donuts—Adding the Final Details. Hang tight; the best is yet to come!
Adding the Final Details
Alright, gearheads and sugar enthusiasts – now we’re hitting the whimsical part of our car cake crafting journey! It’s all about the finishing touches. You know, the ones that make your guests ooh and ahh as they wonder if they should eat it or park it in their garage. 🔧🍰
Cruising with Edible Embellishments
- Headlights and tail lights: Got some gelatin or hard candy? Use a tiny bit of icing to stick ’em on and BAM, you’ve got lights that almost need a dimmer switch!
- Grilles and vents: Take a toothpick or a small knife and carve those details right into the fondant. Here’s a pro tip: gently press some black food coloring into those lines for a bit of extra vroom!
Accurate Accents
- When it’s logo time, don’t shake like you’ve got a flat tire – use a stencil or edible paper to get that branding down to a science.
- And for the livery? Decals are the way to go. Just print them on edible paper, and it’s like your cake’s been through the world’s tastiest paint shop. And yes, the rumors are true – they taste better than regular stickers (don’t ask me how I know).
The Last Polish – Showroom Shine
Now listen, if we’re putting this much work in, our cakes better shine like the top of the Chrysler building, right?
“Get a sponge brush, dip it into some food-safe alcohol (vodka, folks), and gently brush your car. It’ll evaporate and leave your car looking like it’s just been detailed. No DUIs here, promise!”
Congrats, now you’ve got a car cake that’s probably better looking than any real car I’ve ever owned! But don’t ride off into the sunset just yet – we’ve got more potholes to dodge in the world of car cakes. So, keep your sugary seatbelt fastened for our next leg of the journey. Next up, let’s buckle up and dive into some FAQs that nip beginner worries in the bud – stay tuned! 🚗🎂
Hey there, my fellow baking speedsters! So, you’ve maneuvered past the hairpin turns of baking and decorating your car cake, and lemme tell ya, it looks wheely awesome. But wait—what do we have here? A few little pit stops of puzzlement? No worries! Let’s cruise through some of those FAQs that might be leaving skid marks on your confidence. Buckle up! 🍰🚗
FAQs About Crafting Car Cakes
Troubleshooting Tips: What if my fondant tears?
If your fondant suddenly decides to go rogue and split—it’s not the end of the road! Here’s a quick-fix tip: Try kneading it a little more, maybe with a dash of shortening. Still looking like a potholed street? Patch it up with a smidge of the same-colored fondant, and smooth over your problems like you’re the Picasso of pastry.
Safe Transport: How to shift your creation without a crash?
I hear ya, transporting the Mona Lisa of car cakes can be more nerve-wracking than a NASCAR finale. I say steady as she goes! Make sure your foundation is solid (think thick cake board or even a plywood base), then pop that baby into a box that hugs it tighter than your Aunt Edna at Thanksgiving. And drive like you’ve got a sleeping baby in the backseat—it’s cake-saving time!
Sweet Alternatives: Can I make a car cake without fondant?
Prefer not to fondant? Well, color me surprised—but hey, it’s your pit stop. You can absolutely grease the wheels with some buttercream frosting instead. Get creative with piping bags and tips to add texture and details. Who knows? You might start the next trend in confectionery car design, no fondant required!
Over to you!
Now, remember, each cake is a road trip of its own, with its own scenic routes and unexpected detours. But that’s part of the adventure, ain’t it? If you hit a speedbump, don’t fret—just throttle back, enjoy the ride, and remember, it’s all about having fun in the kitchen. Thanks for hangin’ with me today, and hey, keep those whisks whirling and those ovens warm! 🍰💨
And there ya have it. The cherry on top of our cake chat! Happy baking, folks, and keep those car cakes rollin’ out your kitchen garage. Until next time, keep your mixer on the stand and your cake on the podium! And remember: Life’s a cake, and then you ice it!