
Ever feel like you’re Indiana Jones, navigating the perilous jungle of the meat aisle, in search of the Holy Grail of beef cuts? Well, buckle up, my culinary adventurers, because today we’re questing for the perfect arm roast. You know, the kind that promises a feast so tantalizing, your taste buds will be doing the cha-cha. 🕺
Understanding Beef Grades
First thing’s first, let’s rap about grades. Beef grades are like the report cards for meat, and they’re dished out by the USDA. Got an “A” in marbling and texture? That’s Prime, baby! Choice and Select are your solid B’s and C’s, still good but with less fanfare. Always aim high, folks – go for Prime or Choice when your wallet gives the green light.😉
Marbling Matters: Choosing Quality
Now, let’s get down to the nitty-gritty – marbling. Oh, the glorious flecks of fat weaving through the meat like gold in quartz! When you spot a roast with marbling that looks like it could be in a museum, snap it up. This is the stuff that melts and bastes the meat from the inside out during cooking, making it juicier than a gossip column.
Size and Thickness Considerations
Size does matter—no jokes here—especially when it comes to cooking evenly. You want a roast that’s thick enough to stand up to the oven’s heat but not so hulking that the outside turns to charcoal before the inside gets a chance to wake up and smell the coffee. Aim for a good 2-3 inches of thickness, and you’ll be golden. 🌟
Just remember, pals, while you’re out there wrestling that roast into your cart, this is only the first act of our culinary saga. Next up, we’re gonna dive into the world of spices and seasonings, where the real magic begins. Stay tuned for a flavor-packed journey that’ll make seasoning your roast as easy as pie. Spoiler alert: It’s gonna be epic. 🍖
Flavor Tales: Seasoning Your Roast
Oh, folks, buckle up ’cause we’re about to dive into the art of storytelling – seasoning style. And trust me, seasoning a beef arm roast isn’t about tossing some salt and pepper on willy-nilly. It’s like crafting a narrative that’s just as juicy as the roast itself! 🥩
First off, are you team Dry Rubs or team Marinades? It’s like picking your favorite child, but let’s be honest, each has its charm. Dry rubs create this fantastic crust that’s just to die for, while marinades penetrate deep, bringing flavor to every bite. It’s a love story for the ages!
- Dry Rubs vs. Marinades: Think of dry rubs as a spice hug – they cling to the meat, infusing it with flavors. Marinades? They’re the long, tender embrace that tenderizes as they flavor.
- Ideal Seasoning Combinations: You can go classic with garlic, onion, and thyme, or get wild with smoked paprika and a hint of cinnamon. The world’s your oyster, or should I say, the kitchen’s your spice rack?
- The Magic of Salt: When do you salt? Timing’s everything – too early, and you could dry out the meat. Too late, and the salt’s just sitting there on top like an uninvited guest. Aim for the sweet spot, right before the roast hits the heat.
And let’s talk about salt for a hot minute. It’s like the fairy dust of the culinary world and when to season with it can make or break your epic flavor adventure. A little sprinkle ahead of time gives it a chance to work its magic and draw out the inner succulence of the beef. ✨
Oh, and speaking of succulence, ever wondered what to do with leftover crawfish? I’ve got some savory secrets up my sleeve for that one, too.
But back to our beefy business. Once you’ve massaged those spices in, or let that meat soak up the tangy goodness of a marinade, it’s on to the next chapter – the heat is on, baby! I’m talking searing, roasting, and basting. But hey, let’s not get ahead of ourselves. After all, every good story has a bit of suspense, right?
To Sear or Not to Sear
Okay, carnivores, let’s get down to the nitty-gritty – the crux of the cooking conundrum. To sear or not to sear? You’re picturin’ the scenario: you’ve got your arm roast, and it’s beggin’ for that crusty, caramelized hug only a sear can give. But hey, is it really necessary, or can you just skip to the bake?
Here’s the lowdown. Searing your beef is like hitting the flavor jackpot. It creates that delectable crust we all dream about, locking in those juices like Fort Knox. Plus, it’s not just about taste – it’s about texture, baby! But hold your horses; it ain’t just throwin’ it on a hot pan and callin’ it a day. We’ve got to talk technique.
- First up, choosing your cookware wisely is key. A heavy-duty pan that’s oven-friendly? That’s your ticket to sear city. Cast iron? Now we’re talkin’.
- So, you’ve got your pan, and you’re raring to go. Now, timing is everything. Sear that beauty over high heat until it’s browned all over, but watch it like a hawk. We’re lookin’ for gold, not charcoal.
But before you get your sear on, remember this – it’s gonna smoke like a ‘90s pool hall, so crank that vent and maybe disable the smoke alarm (temporarily, of course).
Now, after you’ve given your roast the golden touch, you might wonder, “What’s next?” Well, my friend, it’s time to transition into the gentle embrace of the oven. But that’s a tale for the next section, where we’ll dive into the world of roasting techniques, unveiling the secrets to a perfectly cooked piece of beef. Stay tuned, and keep that oven mitt handy!
Roasting Techniques Unveiled
You know, roasting is a bit like conducting an orchestra. It’s all about harmony, timing, and that little bit of magic that happens when everything comes together just right. But instead of violins and cellos, we’re working with ovens and, of course, our star performer: the beef arm roast.
Oven Temperature Tactics
First things first, let’s talk about the heat. Cranking up your oven to a bajillion degrees might sound like a quick fix, but slow and steady wins this race. A moderate oven of around 325°F (165°C) gives your roast the warm embrace it needs to break down those tough fibers without drying out. Like a gentle summer sun, it’s the golden ticket to a succulent, tender roast.
To Cover or Not to Cover
Ah, the Shakespearean kitchen dilemma! To cover, or not to cover, that is the question. In the realm of roasting, covering your meat can be both a blessing and a curse. While it traps moisture and speeds up cooking, it also denies your roast that enviable, crispy exterior. Why not try starting uncovered, and then tenting with foil if things are getting too hot to handle? It’s like giving your roast a little hat to protect it from getting sunburnt.
The Roast’s Journey: From Oven to Plate
- Start by preheating your oven – this isn’t a cold pool you can just dip your toes into, folks.
- When your roast hits the stage (oven rack), give it space! Don’t cramp its style by crowding the pan.
- Keep an eye on the clock, but don’t be a stage mom. Trust in the process.
Sure, a roast can be a bit diva-ish, requiring the right amount of attention and a delicate touch when it comes to heat. But when you slice into that perfectly prepared cut, it’s all worth it. And speaking of slicing, here’s a little something sweet to follow up your savory masterpiece – because who doesn’t love a good dessert?
Now, as you ease your roast out of the oven, don’t jump the gun – it’s not curtain call yet. We’re moving on to another critical performance: the mastery of doneness. But that’s a tale for another time…
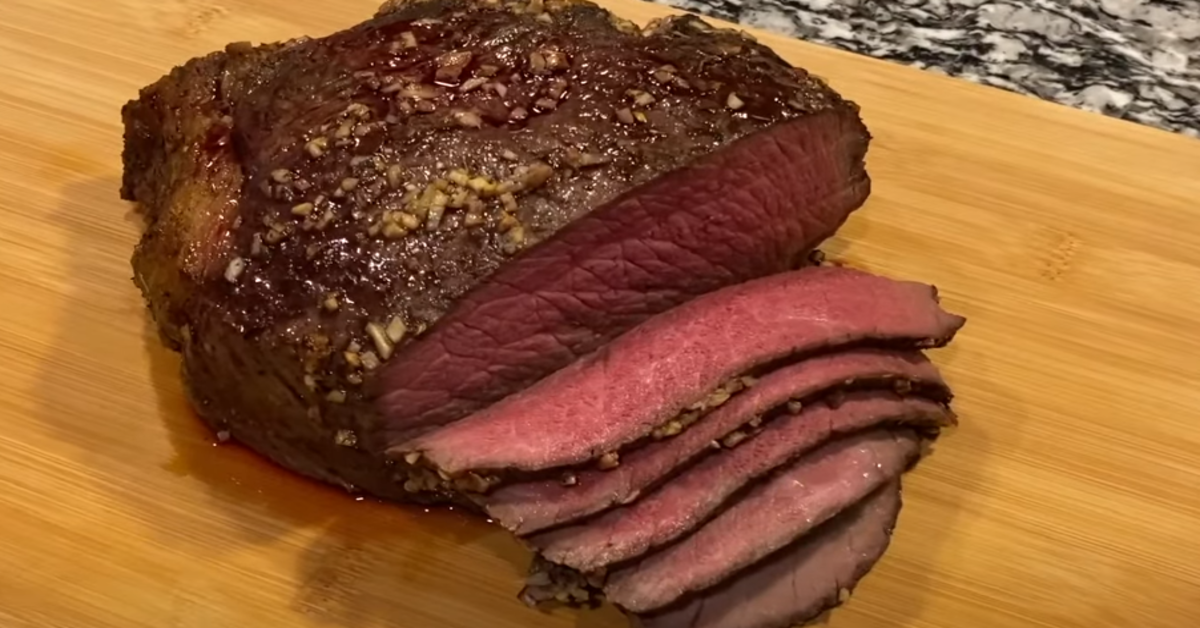
Monitoring and Mastery of Doneness
Ok, folks, let’s dish about the enthralling world of doneness. Trust me, it’s more riveting than watching paint dry! 🎨
Meat Thermometers: A Cook’s Best Friend
When it comes to roasting, flying blind is not the way to go. That’s where your trusty meat thermometer swoops in. It’s like the sheriff of Flavor Town, ensuring your roast isn’t over or undercooked. So, don’t play guessing games when the answer’s only a poke away! Aim for about 145°F for that perfect, juicy medium rare. Pro Tip: Insert the thermometer into the thickest part of the roast, avoiding bones and fat for an accurate reading.
The Feel Test: Alternative to Thermometers
Sure, thermometers are nifty, but what if you’re in a pinch, or feeling a bit old-school? Enter the feel test—like braille for beef! 😄 Press the center of the roast with tongs or a finger (carefully, folks, it’s hot!). Soft and squishy? Too rare. Firm yet springy? Just right.
- Soft and squishy – Too rare, my friend
- Springy but firm – Ding, ding, ding! We have a winner!
Resting: The Final Flavor Lock
Picture this: you’ve crossed the finish line, but before you can collect the trophy, you’ve gotta cool those jets. The same goes for your roast. Let it rest. This isn’t lazy; it’s essential. The juices redistribute, the fibers relax, and voilà—each slice is tender and brimming with flavor. Give it a good 15-20 minutes under a cozy foil tent. Patience, grasshopper.
And hey, while you’re waiting, why not think about what’s next? Like those succulent sides, just itching to strut their stuff alongside your masterful creation. But that’s a story for the upcoming chapter on Sides and Accoutrements—stay tuned!
Sides and Accoutrements
Alright, folks, let’s talk about the unsung heroes of the dinner table – those marvelous side dishes that elevate our scrumptious beef arm roast from great to grandiose! Like a trusty sidekick to a superhero, these accompaniments are more than just add-ons; they’re essential ensemble players in this culinary drama.
Vegetable Medleys for Balance
Let’s be real – a plateful of just meat is kind of like a rock band without a drummer: it’s missing a beat. We need that vibrant veggie harmony to balance the richness of the roast. You’ve got options galore! From the classic garlic-roasted carrots to the decadent green bean almondine, these veggie sides are not just filler, they’re killer!
- Roasted Brussels sprouts – crispy on the outside, tender on the inside
- Buttery corn on the cob – sprinkle a bit of smoked paprika for a twist
- Maple-glazed parsnips – because, why the heck not?
Starching Up: Potatoes and Grains
And what’s a roast without the starchy sidekicks? Are we even doing this right if there aren’t spuds or grains on the plate? I think not! Mashed potatoes with a river of gravy are a no-brainer, but let’s not snooze on the au gratin or the roasted sweet potatoes; they’re like a hug for your tummy.
- Quinoa salad with a lemony dressing – because health, duh
- Creamy polenta – spoonfuls of comfort with every bite
- Fluffy rice pilaf – a little butter, a little onion, and voila!
Creating Harmony with Sauces and Gravies
And finally, let’s whisk our way to sauces and gravies – the symphony of flavors that tie everything together. The right sauce can sing backup to the beef like a gospel choir on Sunday morning. Think beyond mere beef gravy (although, who can resist that?). Consider chimichurri for a tangy twist or a red wine reduction to add some sophistication to the soiree.
So grab your forks and knives, align your taste buds, and let those sublime sides strut their stuff. But hold on to your hats, ’cause next up, we’re diving into the dos and don’ts of storing leftovers. And trust me, you don’t wanna miss these life-altering tips, folks!
Storing Leftovers Like a Pro
So, you’ve conquered the beef arm roast, and your dinner pals are rubbing their bellies in satisfied bliss. But hey, what’s this? Leftovers? Awesome! Leftovers are like a bonus round – they keep the joy going, provided you store ’em like a champ. Let’s dive into the epic encore of mealtime: leftover logistics.
Best Practices for Refrigerating
- First off, don’t let those leftovers languish on the counter. You’ve got about two hours post-cooking to get ’em chilly before bacteria crash your party.
- Slice it up! Cutting your beef into smaller pieces lets it cool more evenly and makes fridge stacking a cinch.
- Seal the deal with airtight containers or wrap that sucker up in aluminum foil. Oxygen is not your friend here, folks.
Freezing: Keeping the Flavor Fresh
- Got more roast than you can handle in a couple of days? Let’s talk freezer strategy. Portion out your roast like you’re setting up meals for the future—’cause you are!
- Double-bag it if you’re using freezer bags – no one likes freezer-burnt meat.
- “Freeze it flat”, as my Grandma used to say. This way, it thaws faster and you don’t end up chiseling out a chunk of roast for your Tuesday night dinner.
Reviving Leftovers: Tips and Tricks
Reheating is an art. You can’t just blast it in the microwave and hope for the best. Gentle heat is the key, my friends. Try covering it with a damp paper towel to keep the moisture right when nuking. If you’re going oven-route, low and slow does the trick, and a splash of beef broth? Chef’s kiss! Keep that flavor locked in as if it’s a state secret.
And don’t forget, leftovers are a springboard for culinary creativity! That roast can become sandwiches, stir-fries, or even a hearty beef stroganoff the next day. Just add some spices, maybe some veggies, and bam! A transformation worthy of a stage magician.
Sides and Accoutrements
Onward to the supporting stars of our meal – the sides! Like any great performer, our beef arm roast thrives in good company. So let’s chat about veggie options that’ll round out your meal like the perfect supporting cast. ‘Cause after all, what’s Batman without his Robin, right?
FAQs About Cooking a Beef Arm Roast
Alright, folks, gather ’round because it’s time to dish out some answers to those head-scratchers you’ve been stewing over about beef arm roasts – you know, the ones that pop up just as you’re about to channel your inner kitchen rockstar. 🎸
Balancing Time and Weight
So, you’ve snagged yourself a prize hunk of beef arm roast and now you’re fretting over how long to cook this bad boy? Fear not, meat mavens! The golden rule is simple – go by temperature, not time. Grab your meat thermometer (a cook’s best sidekick) and aim for 145°F for that perfect medium-rare magic. Remember, size does matter here; bigger roasts need more time, but keep an eagle eye on the temp to avoid a culinary tragedy. 😢
Accommodating Dietary Restrictions
Got a table full of guests with more dietary needs than a health food convention? Listen up, ’cause tweaking the traditional beef arm roast to play nice with everyone’s belly is easier than convincing a toddler that veggies are candy. If gluten’s the gremlin, avoid gravies thickened with flour and switch to cornstarch. Low sodium? Cut out the salt and let those herbs and spices do the heavy lifting. And for the love of kitchens, always check with guests about allergies – your reputation as host with the most is on the line!
Beef Arm Roast vs. Other Cuts: What’s the Difference?
Ever wonder why beef arm roast doesn’t get the same fanfare as the prime rib? Well, it’s the unsung hero of the beef world, if you ask me! This cut comes from the cow’s shoulder – it’s leaner, meaner, and packed with beefy flavor that can stand toe-to-toe with any fancy-schmancy cut. Plus, it’s easy on the wallet, which means more moolah for those killer sides you’re plotting. Arm roast, my friends, is where patience meets prowess on the plate.
In closing, don’t let the lesser-known rep of the beef arm roast scare ya. It’s a champion in its own right – tasty, tender (if you treat it right), and terrific for your next dinner shindig. Now go forth and conquer that kitchen! And hey, thanks for hanging out in my little corner of the internet – it’s been real. Catch ya on the flip side! 👋🍖